Free Support
We provide Free Customer Support for all Curly Themes products through our quick and easy ticket application interface. Please limit your inquiries to problems related to the Weekly Class Schedule Plugin, its setup and features. For any problems concerning third-party plugins you should address the application’s developer.
Note: We can not offer support for custom CSS code customization. You should ask a professional developer for aid if you require help with advanced customization and programming.
Curly Themes offers a free ticket support application for all clients, through a real-time license code automatic verification. The dedicated app is fast and easy to use and includes an email notification feature. We will let you know as soon as your inquiry has received an answer. Thanks to our modern design, you can also upload images as an attachment to your support ticket.
Before writing a ticket please get your Purchase Code and your License Certificate:
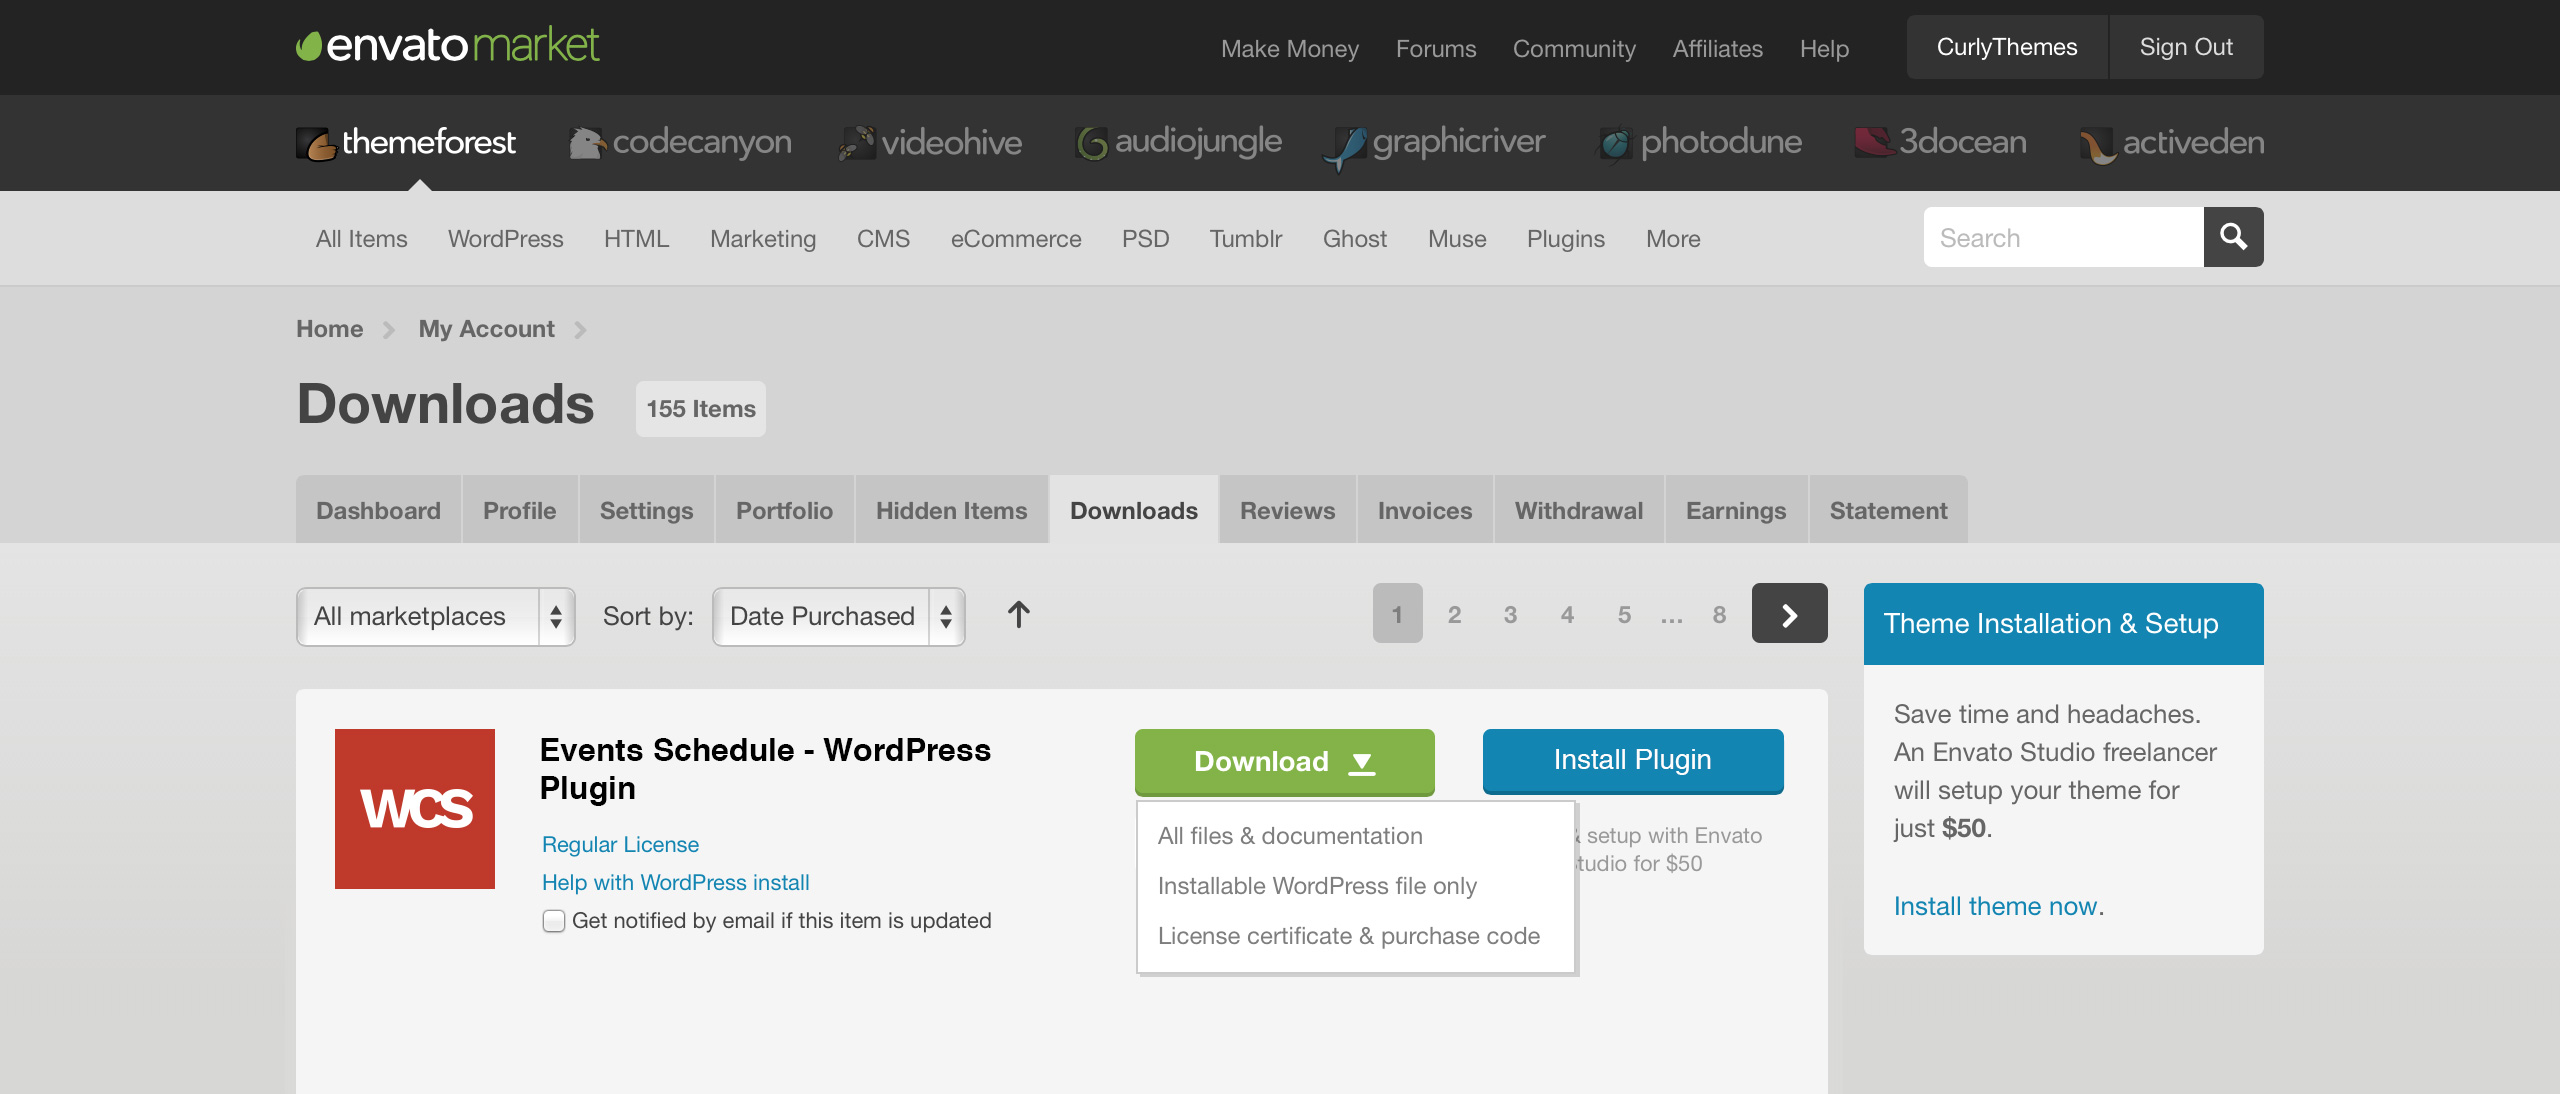
Events Schedule purchase code
Before opening a new ticket, please make sure you have read through all our documentation. Also, our FAQ section contains helpful answer to questions we often receive from our customers. Following these steps is in the users’ interest, as they will save valuable time. Still, we are always happy to respond to any inquiries you may have related to the Weekly Class Schedule Plugin.
Installing the Plugin
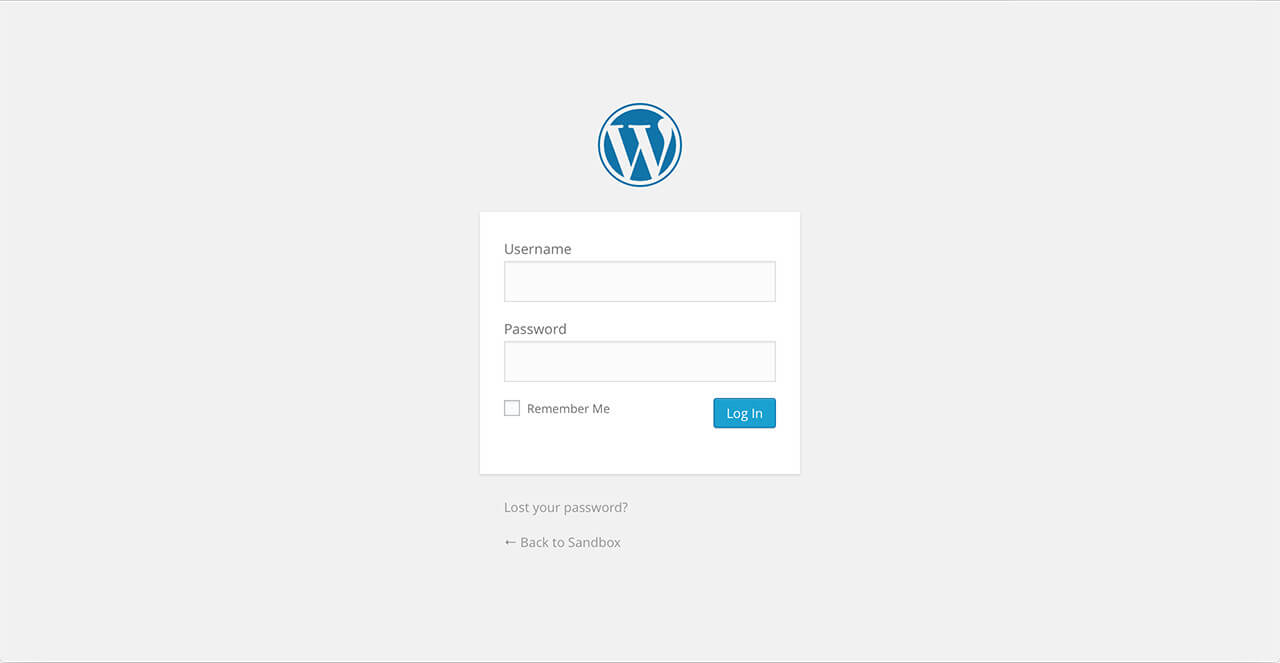
weekly-schedule-login
Before installing this plugin, you need to have a WordPress platform already installed on your server. You can download it from WordPress.org, if you don’t have it already.
If you do not know how or you have problems with the installation, you can access helpful information at:
Once you have a working WordPress on your server, you have two available ways to install this plugin.
FTP Upload
- Step 1 – Unzip the .zip package file you downloaded from Code Canyon and locate the folder named weekly-class
- Step 2 – Upload this folder on your server in your WordPress directory to /wp-content/plugins/
WordPress Upload
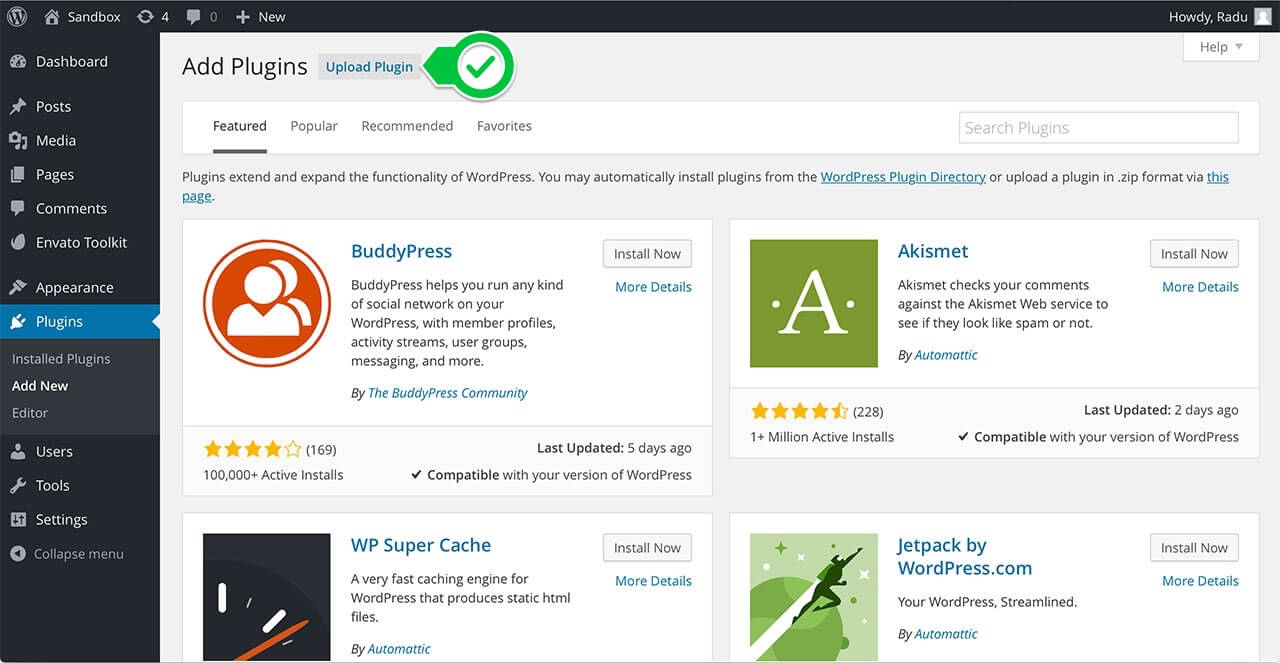
weekly-schedule-upload
The second way to install the plugin is by logging in from your website’s http://yourwebsite.com/wp-admin/ to the WordPress Dashboard and:
- Step 1 – Go to Appearance > Plugins > Add New > Upload
- Step 2 – From there, you should select the file weekly-class.zip from your computer
- Step 3 – After clicking the Install Now button, the installation process is finished
- Step 4 – After installing the plugin is recommended to activate it by clicking Activate Plugin
Activating the Weekly Class Schedule Plugin
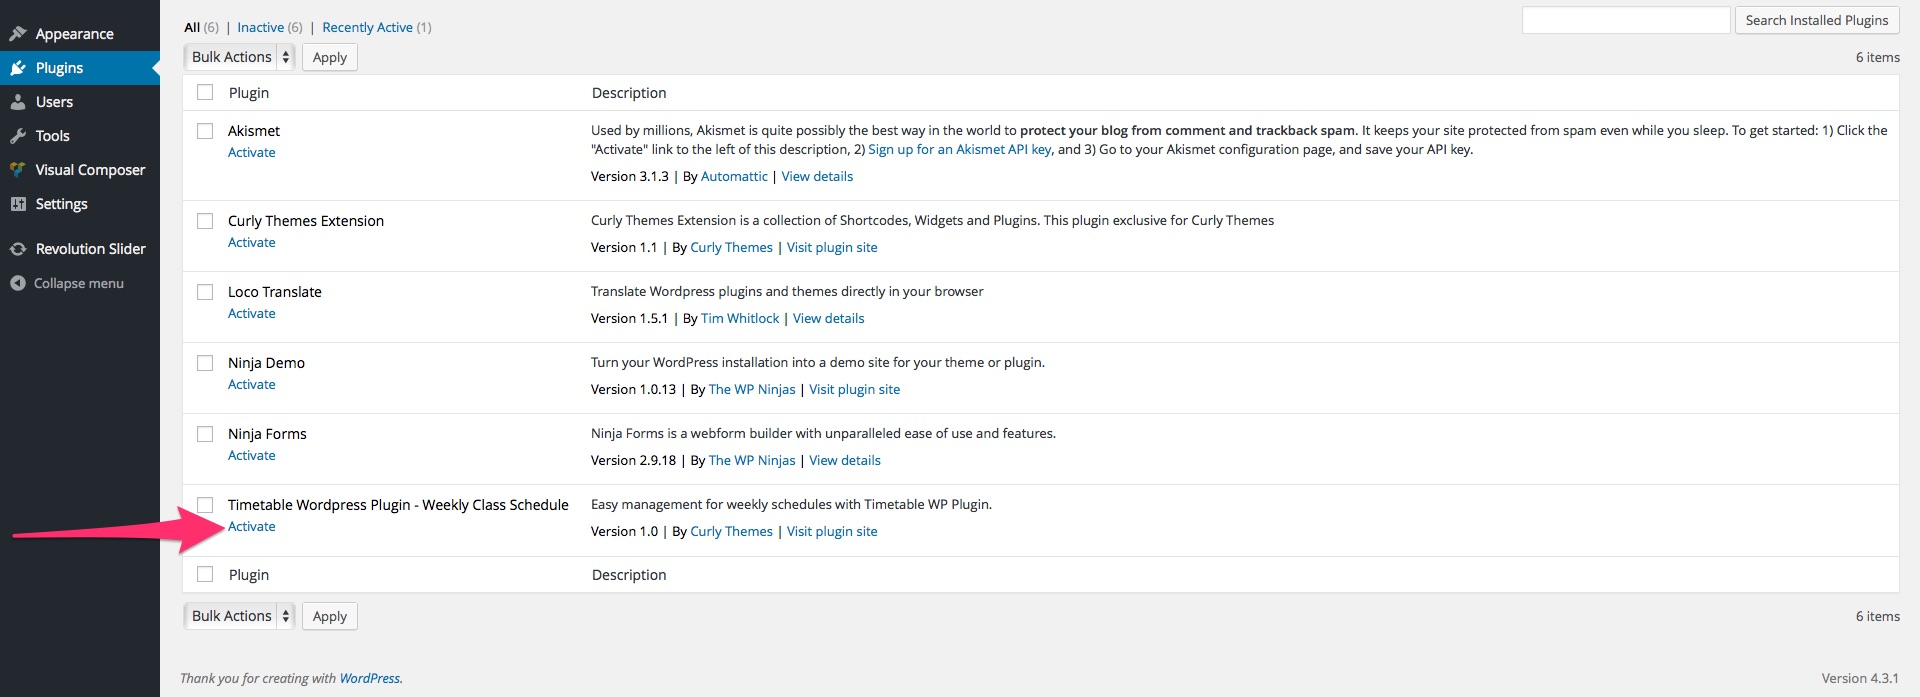
weekly-schedule-activation
After you have completed the install process, in either of the two ways, you need to activate it in case you didn’t already in the WordPress installation method.
Log in to the WordPress Dashboard, go to Plugins >Installed Plugins and select Weekly Class Schedule Plugin. Click the Activate button and you can start using the plugin.
Importing the Demo Content
In the Weekly Class Schedule download package you can find the Classes XML file (located in the demo content folder) that you can use for a quick classes set up. Images are not included in the XML file.
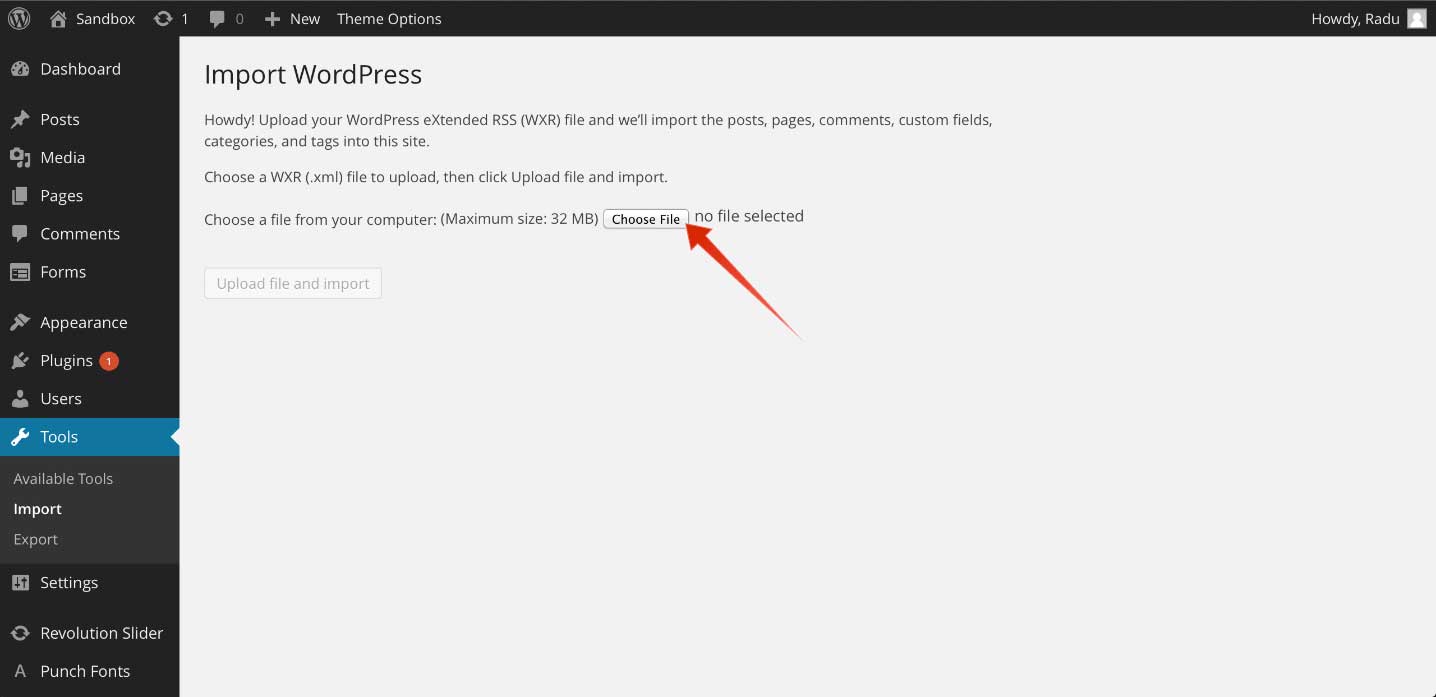
To import the demo XML file, in the WordPress dashboard go to Tools > Import and select to install from the list WordPress Importer. After the installation is complete, select and upload the XML file. You can find the Classes XML file in the demo content folder at root level in the Weekly Class Schedule download package.
import-leisure-demo-content
After this, the imported posts will appear in your Classes > All Classes tab.
You can import also the demo schedules. In the Weekly Class Schedule download package you can find the Schedule JSON file (located in the demo content folder) that you can use for a quick schedules set up.
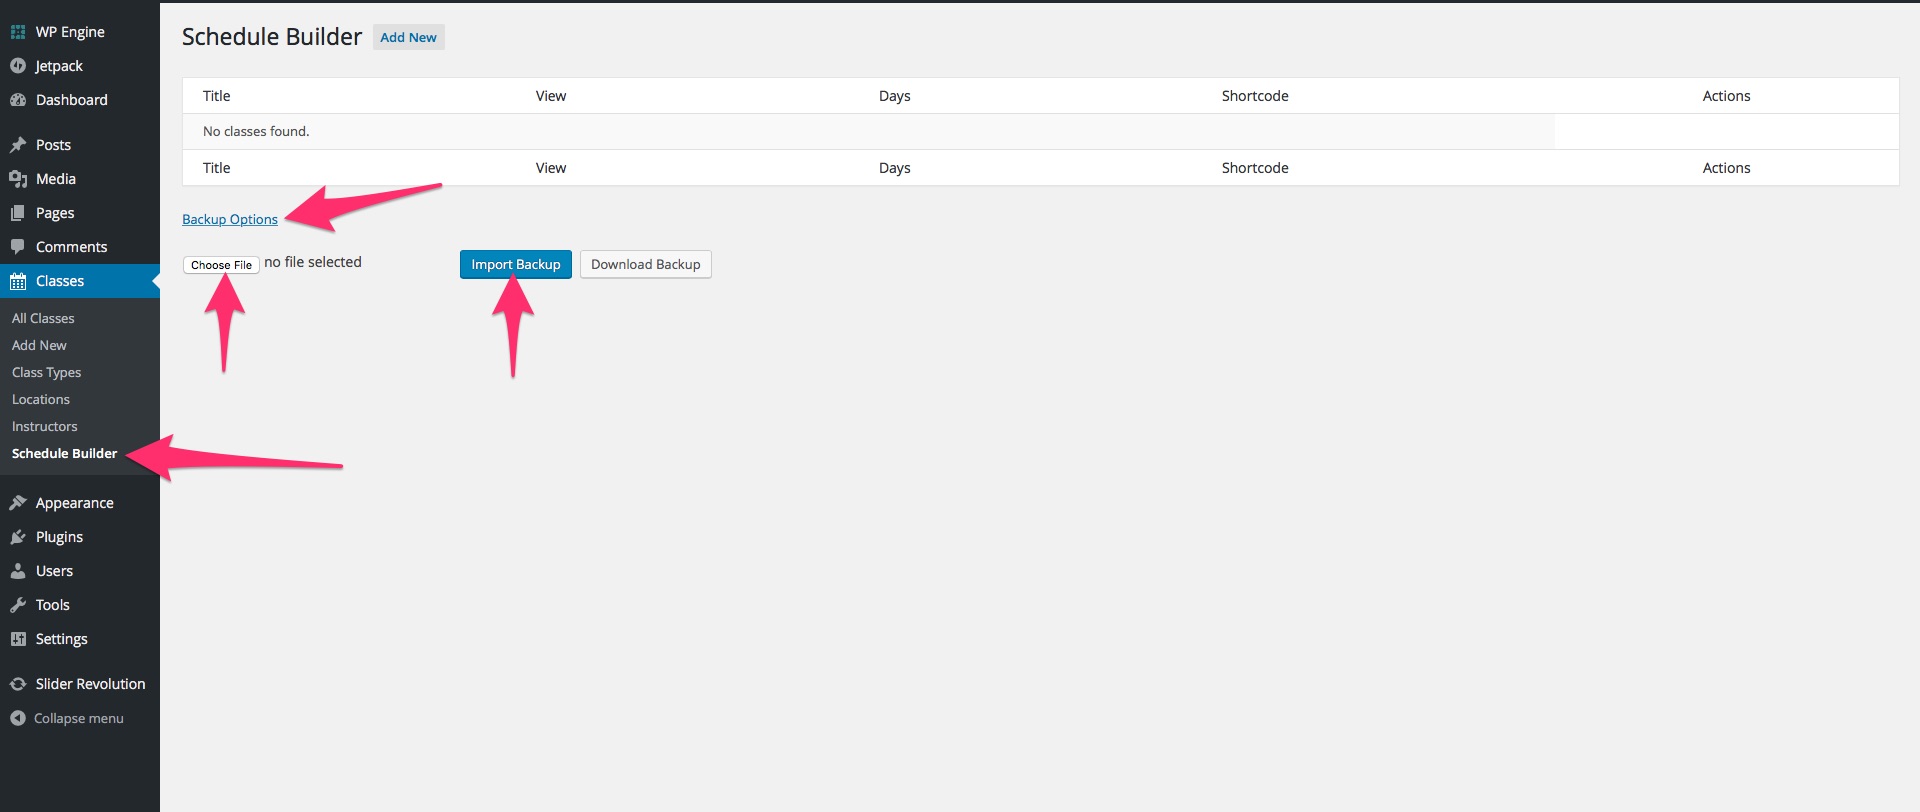
To import the demo JSON file you should go at Classes > Schedule Builder and click on the Backup Options button, to reveal a row of buttons. Click on the Choose File button, to browse for the demo JSON file, select it and click on the Import Backup. If you wish to create a backup of your own schedules, you can use the Download Backup button, that will export your schedules in a JSON file.
Schedule Backup
Quick Plugin Setup
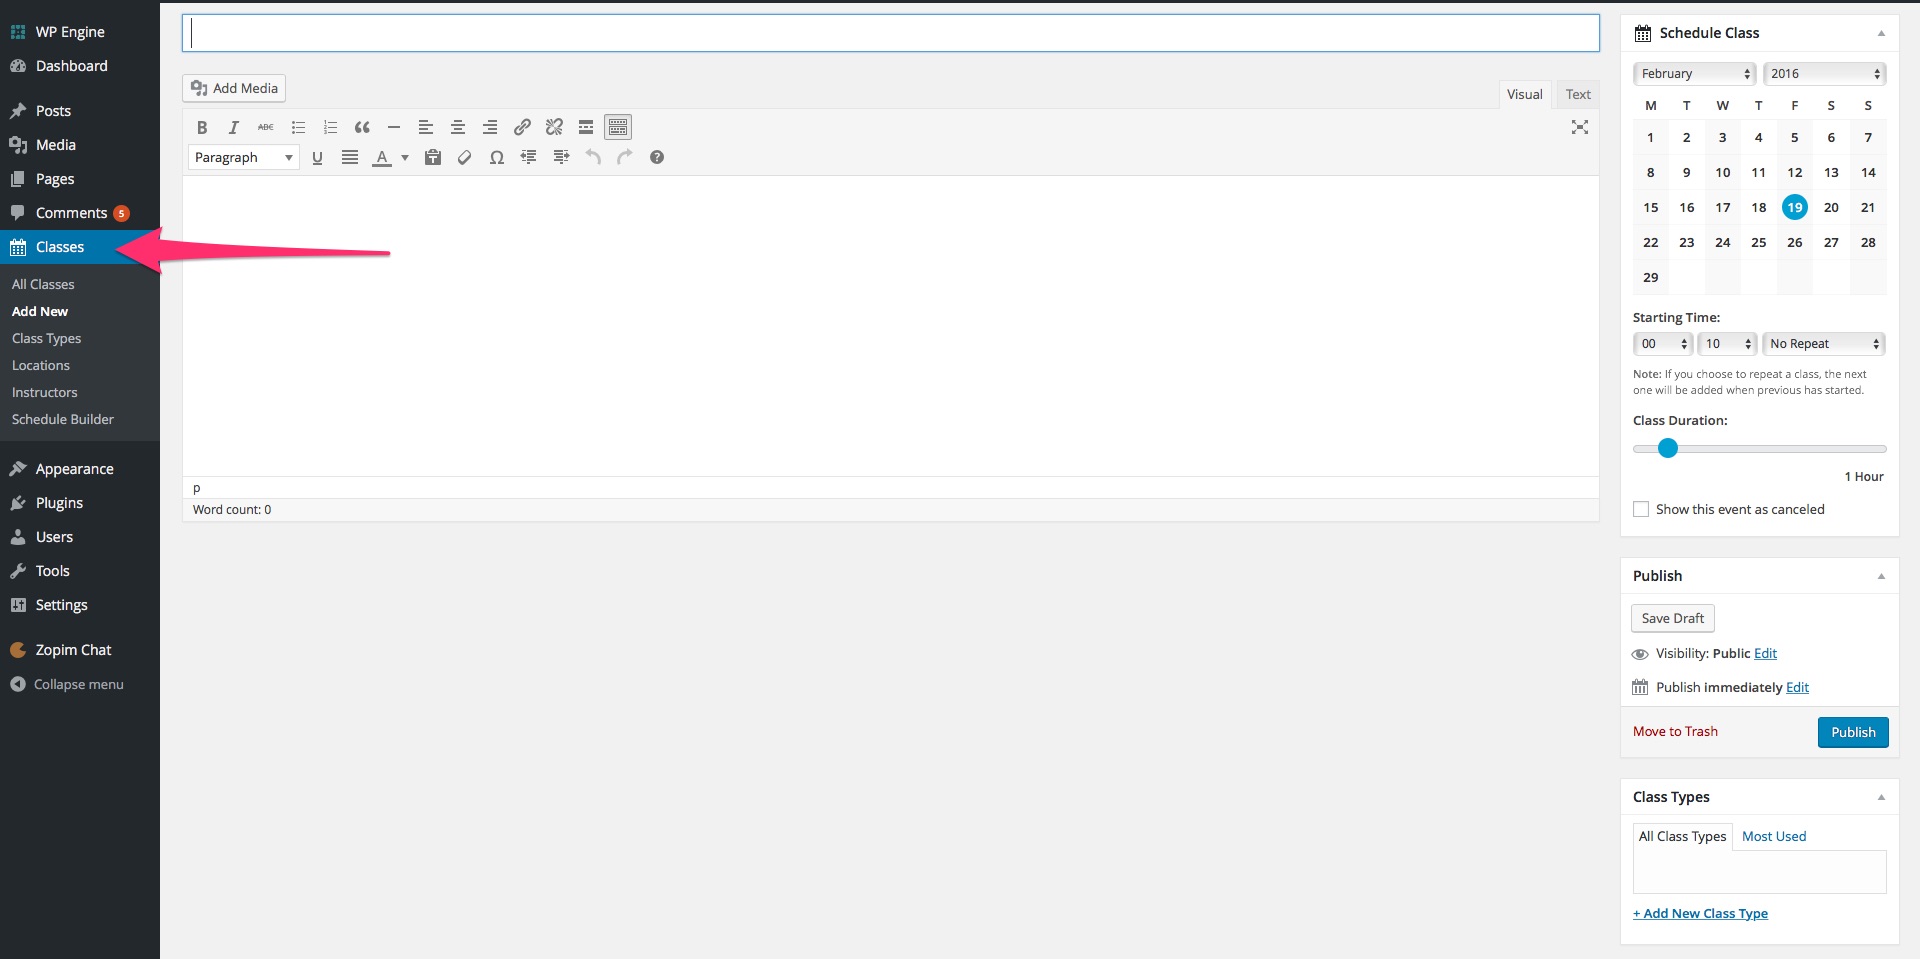
After installing and activating the Weekly Class Schedule plugin, the options panel, named Classes, will appear in your dashboard on the left sidebar, between the tabs Comments and Appearance:
Weekly_Class_Schedule
You will be able to fill your schedule with events by adding Classes, just like regular WP posts. Each Class post can be customized with various options and you can assign Class Types, Locations and Instructors.
Adding a New Class
Add New Class
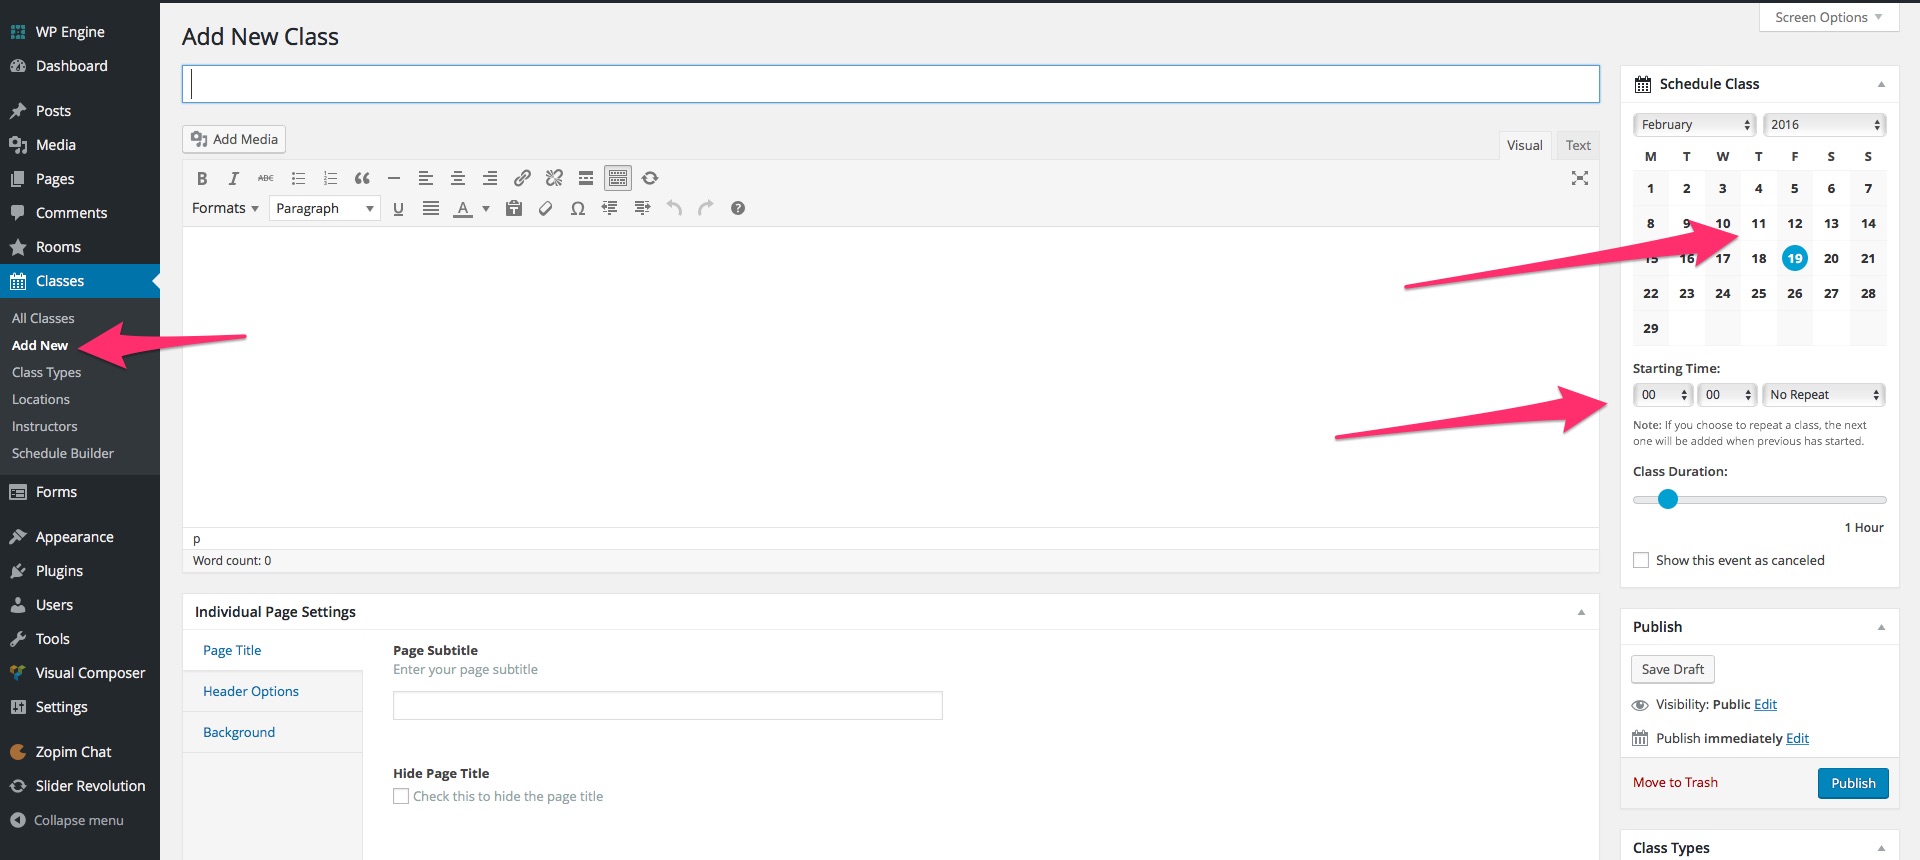
Go to Classes > Add New to create a new class entry, just like you would create a normal post. After you publish the post, the entry will appear in your schedule. You can customize the class with the Schedule Class options box, on the right sidebar:
- Starting Date & Time – Use the select boxes to choose the starting date and time for your Class.
- This is a multi-day event – Check this box if you wish to create an event that stretches over several days. This will replace the Duration slide bar with the Ending Date & Time select boxes, which allow you to set the ending date and time for your event. NOTE: A multi-day event can be displayed only in the schedule styles with an adequate design: Plain List, Events Carousel and Masonry Grid. You can also use it for a Cover or a Countdown.
- Last Repeat Date – If you set the event as Repeatable, you can use this field to choose a last repeat date. This will be the last date when the event will be displayed in the schedule.
- Duration – Use the bar to select how long is the Class. The minimum length is 5 minutes and the maximum is 24 hours.
- Repeat – You can leave the No Repeat option active to make it a one time event, or you can choose Repeat Daily / Weekly / Every Two Weeks / Monthly / Yearly, to create a Class that will be scheduled every day / week / month / year, at the same time, with the same settings. With Repeat Custom, you can choose custom dates for each class repetition. If you choose Repeat Daily, you will reveal checkboxes for each day of the week, so you can make the event repeatable only for particular week days.
- Status – If you want to display the event as canceled, you can use this select box to switch from Live to Canceled. If it is a Repeatable class, all classes will be canceled. A canceled class will appear in your schedule with all the words crossed out. The option Canceled Dates is only for repeatable events and allows scheduling dates when the event will be canceled, without affecting the weekly recurrence.
For each class, from the right side boxes, you can assign Class Types, Locations and Instructors. Class Types can be first level or have a Parent Class. You can create Class Types, Locations and Instructors directly from the boxes or through the dedicated options panel in the Classes module.
Class Settings
Class Image
- Class Image – You can assign a featured image for the class. This will be displayed in the pop-up modal window for all schedule and directly in the schedule for the Plain List style and the Events Carousel.
Action Button
- Button Label – Type in here the title for the action button. If you leave this field empty, the button will not be displayed.
- Button Action – You can create a Call-to-action button for the class with one of the four available functionalities: Go to page, Go to custom URL, Email or Download iCal Event.
- Button Target – Choose how the action button will open, in a New Window or Same Window.
If you wish to add a map for the class, you can configure it in the Map Details tab with the following options:
- Map Latitude – Enter the latitude coordinates so the map will show your desired location.
- Map Longitude – Enter the longitude coordinates so the map will show your desired location.
- Map Type – Choose one of the four map types available: Roadmap, Satellite, Hybrid and Terrain. Default is set to Roadmap.
- Map Color Theme – Choose a color theme for the map: Light, Dark or leave it Default.
- Map Zoom – Enter the zoom level of the map, from 1 to 18.
Please note, the map will be displayed in the pop-up modal window or in the class page and it will appear only if you set a valid value for latitude and longitude coordinates.
You can also add an Excerpt, that will be displayed below the class, for several schedule styles. The Excerpt tab is at the bottom of the page, below Individual Page Settings. If you can not see the field, you need to click on Screen Options, at the top-right corner of the screen, and check the box for Excerpt.
Class Types
Go to Classes > Class Types to create and manage your class types. Those will be displayed, for each class, in your schedule timetable.
- Name – Type in the name for your class type. Examples: Fitness, Yoga, Latino.
- Slug – The link slug for the class type will be auto generated. You can type in a custom one.
- Parent – If you want, you can assign a parent to the class type.
- Description – If you want, you can add a description for the class type. This will be displayed in a pop-up, when clicking on the Class Type name in the schedule. Also, you can make the Class Type name a link, if the Description field’s content is just an URL.
- Color – If you want to display some classes with a different color in the schedule, you can assign a color to the Class Type. The coloring style will depend on the Schedule Style used, as each style has its own particular way to display colored classes. The color of the class will override the color of the parent class.
Locations
Go to Classes > Locations to create and manage your locations. Those will be displayed, for each class, in your schedule timetable.
- Name – Type in the name for your location. Examples: Main Room, Yoga Room, Red Room.
- Slug – The link slug for the location will be auto generated. You can type in a custom one.
- Description – If you want, you can add a description for the location. This will be displayed in a pop-up, when clicking on the Location name in the schedule. Also, you can make the Location name a link, if the Location field’s content is just an URL.
Instructors
Go to Classes > Instructors to create and manage your instructors. Those will be displayed, for each class, in your schedule timetable.
- Name – Type in the name for your instructor. Examples: Mark Taylor, Diana Johnson.
- Slug – The link slug for the instructor will be auto generated. You can type in a custom one.
- Description – If you want, you can add a description for the instructor. This will be displayed in a pop-up, when clicking on the Instructor name in the schedule. Also, you can make the Instructor name a link, if the Instructor field’s content is just an URL.
Events Schedule Settings
Classes’ content will be displayed by default in a pop up window. If you wish to use a class page instead of the pop up window, you can go to Classes > Settings and customize the page with the following options:
- Event Single Page – If you activate the Event single page option, your classes will have a page with URL. To replace the pop up with this page, you will need to go in the Schedule Builder, at Modal Options, and select Disabled.
Event Page
- Event Page Template – Use this select box to choose the page template for all your class pages.
- Event Page Slug – Type in the slug for the classes URL. Default is class.
- Events Box Position – Choose the position of the info box in the class page. Available options are Center, Left and Right. You can also Disable it.
- Special Color – If you have the info box active, you can choose here the color for elements, like buttons or titles.
- Date Format – If you have the info box active, you can use this field to customize the data format.
- 12h Time Format – Use this option to switch from a 24-hours format time to a 12-hour AM / PM format.
- Show Ending Time / Duration / Location / Instructor / Map – If you have the info box active, you can use these options to show/hide info.
Google Maps
- Google Maps API Key – For best performances we recommend using your own Google Maps API Key. This API Key will be used for both your class page map and your pop up window map.
If you check the box to display a map, you can customize it with the following options:
- Map Theme – Choose a color theme for the map: Light or Dark.
- Map Zoom Level – Enter the zoom level of the map. Default is 15.
- Map Type – Choose one of the map types available: Roadmap or Satellite.
Advanced
- Enable Lazy Load – Activate this to load the schedules after the other page content was loaded. This will speed up your loading time and might also help avoid conflicts with third party plugins.
- Insert JS Templates before Footer – Activate this to place the JS templates before the footer, instead of in the footer. This will help fix JS conflicts with third party plugins.
- Maximum Years – Use this slide bar to choose the maximum years span of your schedules. If you have a large span, it might affect your loading time.
- Enable Archive – Activate this to enable archive pages for your events and taxonomies.
- Enable Caching – Activate this to enable plugin caching.
Schedule Builder
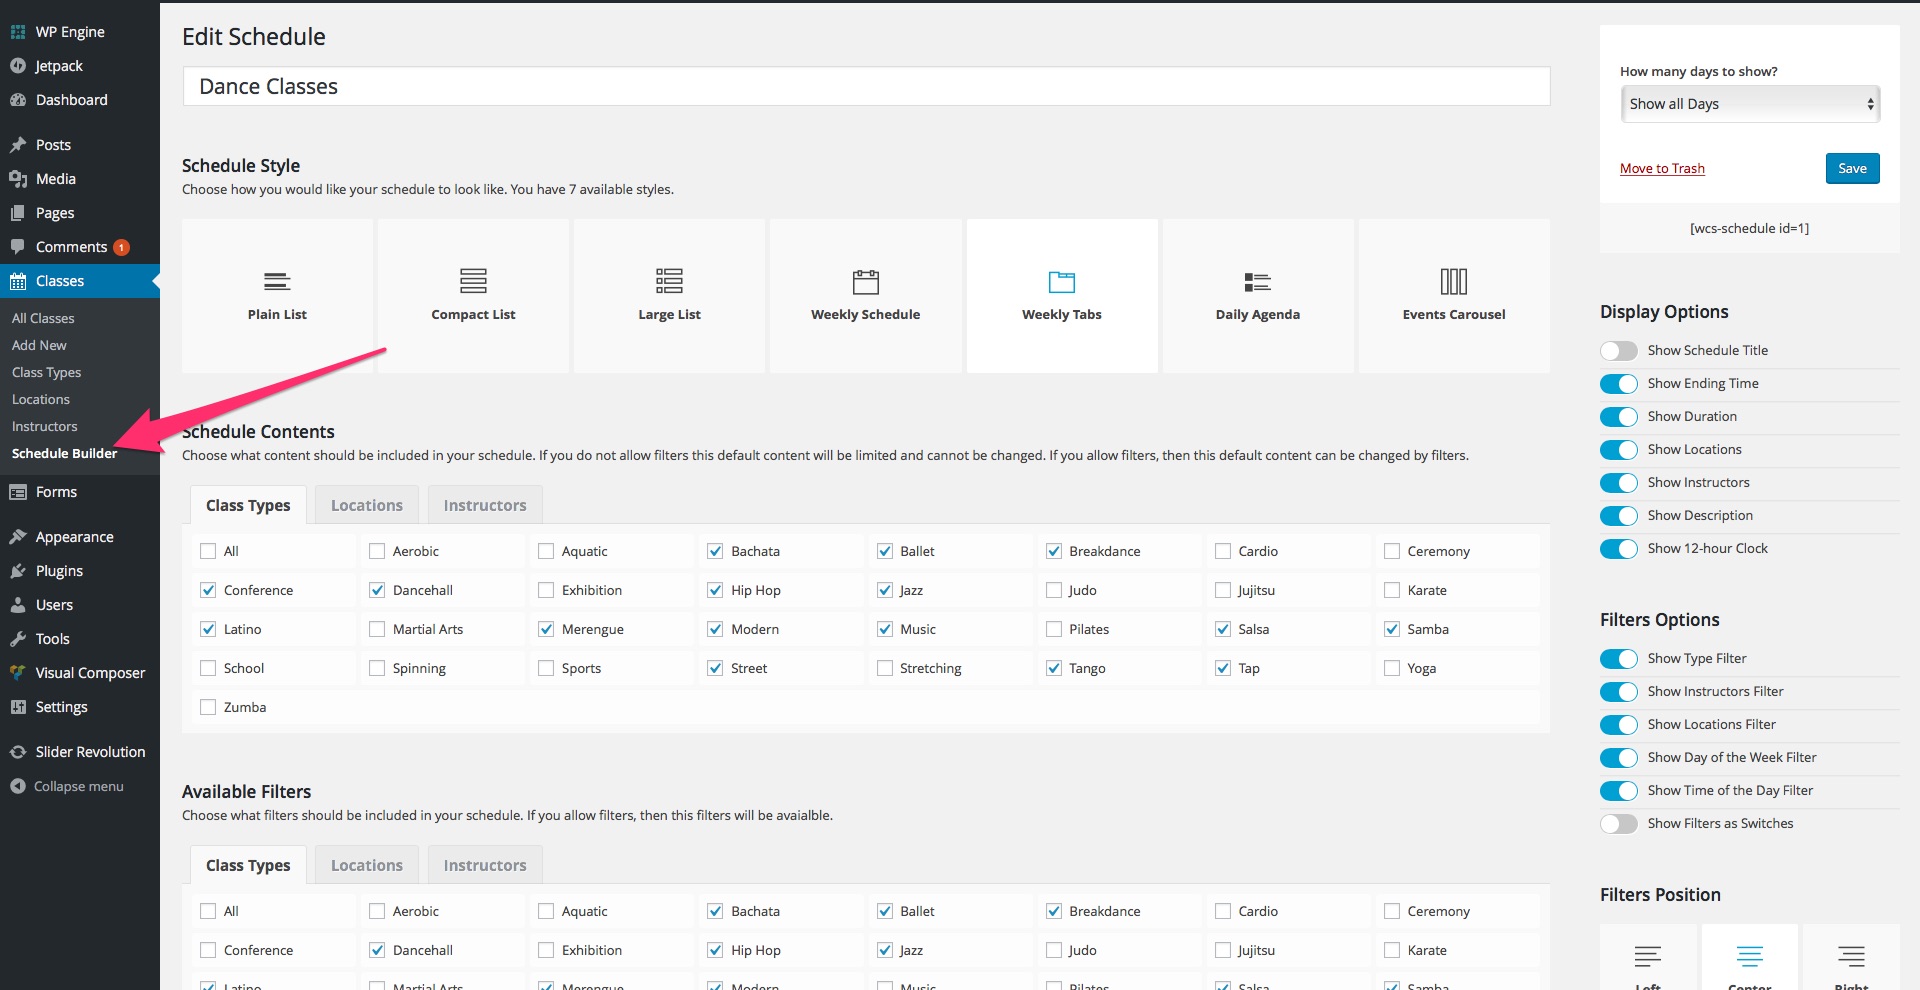
Schedule Builder tab
After creating your classes, you should go at Classes > Schedule Builder and create one or several schedules, with the settings and style of your choice. You can easily manage the schedules from this tab, by adding a new one or deleting, duplicating or editing schedules you already created. Once you have your schedule built, you can use a simple shortcode to place it in a page, like this:
[wcs-schedule id=1]
If you have the Visual Composer plugin installed on your platform, you can insert the schedule through our custom Visual Composer element. Click on the + button to add a VC element, select Weekly Class Schedule element from the list, and add it in the page.
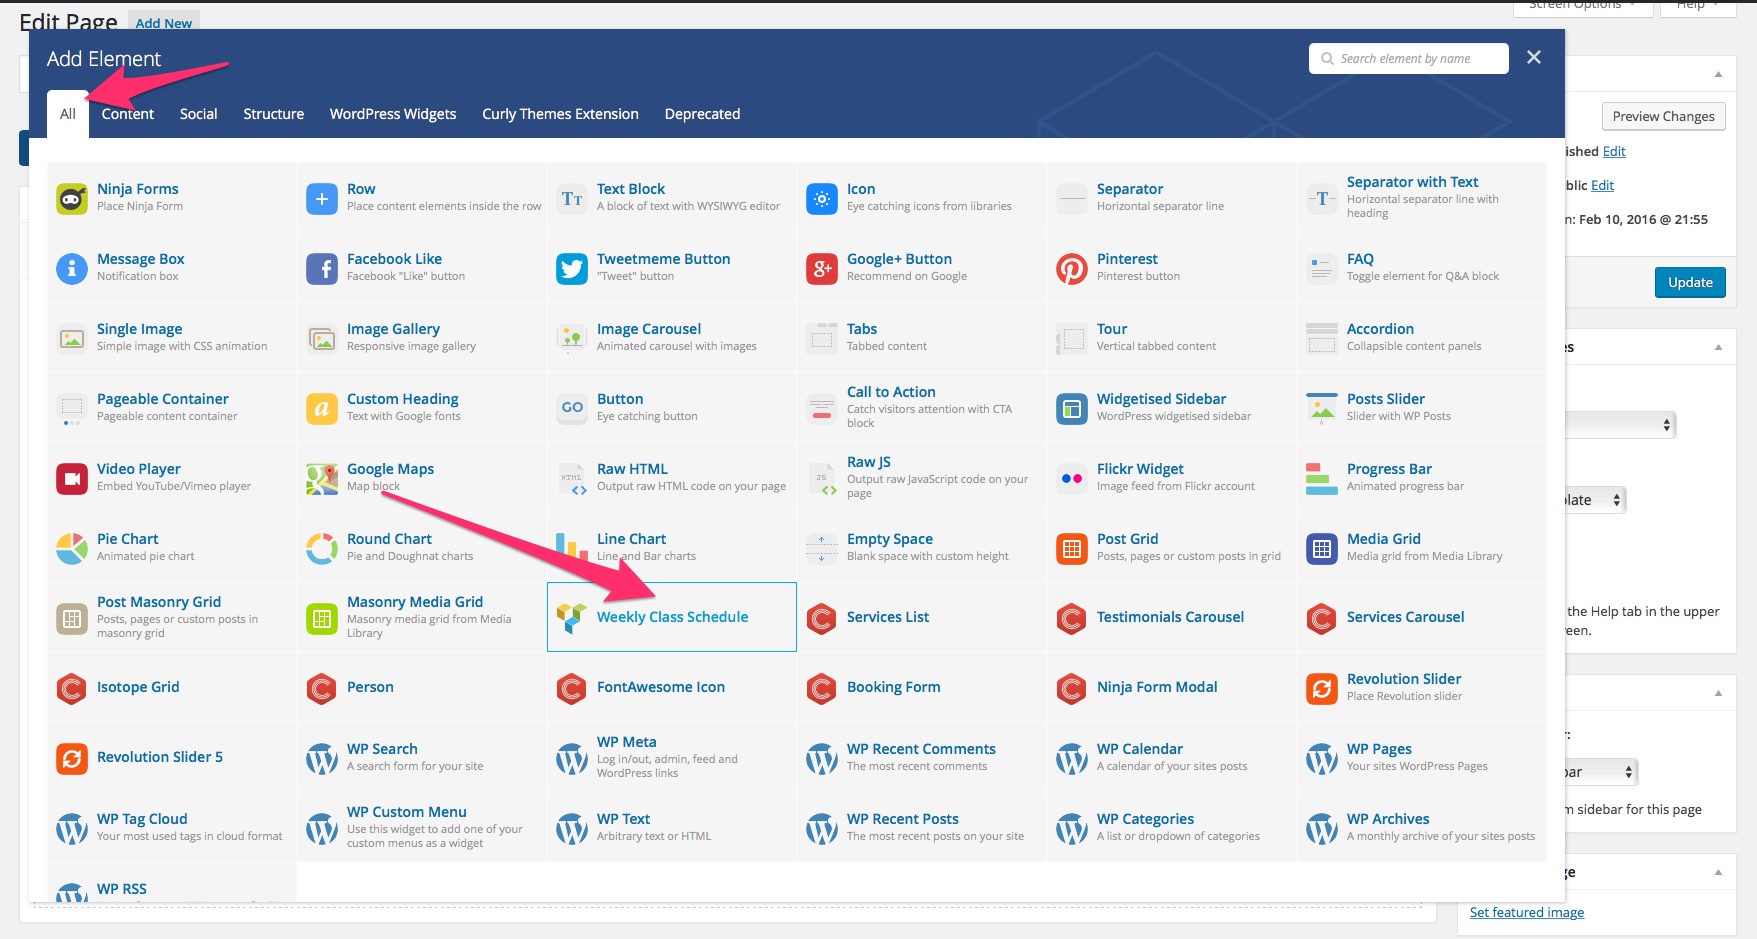
Visual Composer Element
The only option you need to configure is the Choose Schedule select box, where you can select which schedule you want.
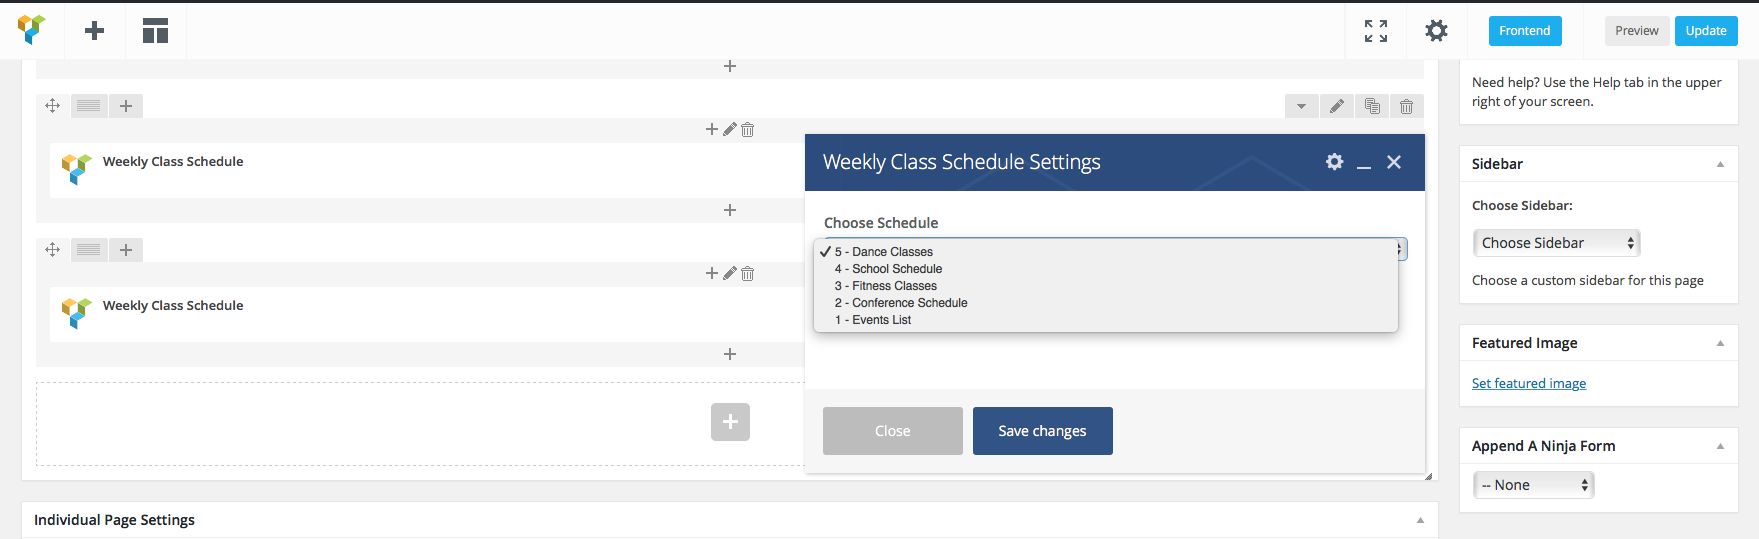
VC Element Box
The schedule can be customized through the following options:
- Schedule Style – You have 12 styles available for the schedule, each with a different layout, design and info displayed. Depending on your business and purpose of the schedule, you can choose the appropriate one. There are 3 list styles: Plain List, Compact List and Large List, a Weekly Schedule that is similar to a calendar and Weekly Tabs, that splits the classes with a tab for each day. The new styles are Events Carousel, that allows a graphical carousel display, Daily Agenda, a simple calendar view, Masonry Grid, a dynamic grid with images, Monthly Calendar, a calendar view allowing month by month navigation, and Timeline, a simple vertical timeline display. There are also 2 styles for showcasing a single event: Cover and Countdown.
- Choose Contents – The 3 tabs (Class Types, Locations and Instructors) allow you to define which classes will appear in the default schedule display. If you select only several Class Types / Locations / Instructors, then only the classes assigned with a selected Class Type / Location / Instructor will appear.
- Available Filters – The 3 tabs (Class Types, Locations and Instructors) allow you to define which options will appear in the filters. Please note, you have to allow filters to display them.
- Type / Location / Instructor / Label – You can use these fields to type in the label for the Class Types / Locations / Instructors info in your schedule.
- Type / Location / Instructor / Filter Label – You can use these fields to type in the label for the Class Types / Locations / Instructors filters in your schedule.
- Previous / Next Label – If you are using Monthly Calendar or Weekly Schedule with show navigation, you need to use these fields to type in the labels for the previous and next navigation buttons.
- Days of The Week Filter Label – You can type in the label for the filter allowing to sort with the 7 days of the week.
- Time of The Day Filter Label – You can type in the label for the filter allowing to sort with the Morning, Afternoon and Evening options.
- More Classes Button Label – You can type in the label for the button which loads aditional classes, that were not scheduled in the initial time selection.
- Filters Toggle Button Label – You can type in the label for the button which allows you to show or hide the filters.
- Info Button Label – If you are using Plain List, Countdown or Cover, you can type in the label for the button which opens the pop-up description, displayed next to each class.
- Nothing to Show Message – You can type in the message displayed when there are no available classes matching the selection.
- How many days to show? – Use this select box to choose the period of time that your schedule will display. Available options are: Show all Days, 1 / 2 / 3/ 4/ 5/ 6 Days and 1 / 2 / 3 / 4 Weeks. Please note, if you use the Show all Days option, the schedule will display all classes, with the repetitive classes displayed 4 times repeated in the future.
- How many events to show? – If you are using the Show all Days option, you can use this slide bar to choose an exact number of events to be displayed. If you leave it at 0, all events will be displayed.
- Display Options – You can use the Show Schedule Title / Ending Time / Duration / More Button / Class Types / Locations / Instructors / Description / Excerpt options to display or not the desired info in the schedule. Show 12-hour Clock allows you to switch from a 24-hours format time to a 12-hour AM / PM format.
- Show Past Events – If you activate this option, your schedule will display also the current day events that are already over. Activating this option will reveal Reverse Order option and Past Events Starting Date calendar, that you can use to display past days events, by choosing the earliest past date of the schedule.
- Reverse Order – If you activate Show Past Events and use one of the styles: Plain List, Large List, Compact List, Events Carousel or Daily Agenda, you can activate this to display events in a reverse chronological order.
- Date Format – For 8 schedule styles (Compact List, Large List, Weekly Tabs, Timeline, Masonry Grid, Events Carousel, Cover and Countdown) you can customize the date format in the schedule, according to Moment.js supported date formats.
- Filter Options – You can use the Show Type / Instructors / Locations / Day of the Week / Time of the Day Filter options to display or not the desired filters. Please note, by displaying or not a filter, you might restrict the classes that the visitors will be able to see. You can also choose switches instead of checkboxes and display the filters expanded.
- Filters Position – If you allow filters, you can use this to choose the filters location. You have 3 available options : Left, Center and Right.
- Modal Options – You have two available choices for the pop-up modal window style: Small Image or Large Image. You can also Disable it, if you want to use class pages, instead of the pop up window.
- Enabled Light Modal Window – You can use this option to activate a light colored pop-up modal window.
- Show Starting & Ending Time / Duration / Class Types / Locations / Instructors – You can use these options to display only the info you want in the pop up window.
- Date Format – You can use this field to change the date format for the pop up window., according to Moment.js supported date formats.
- General Coloring – Text / Special Color – Use these options to choose the schedule colors. The special colors is used for important elements, like titles, buttons, etc.
- Weekdays Coloring – If you want to display all classes in a day with a custom color, you can assign here a color for any weekday you want.
- Grid / Timeline Item Bg Color – If you use the Masonry Grid or Timeline styles, you can use this option to select a color for the elements background.
Weekly Schedule Options
- Group by Starting Hour – If you activate this option, the classes will be grouped horizontally, by starting time. Classes which start at the exact same time will be displayed on the same line. Also, a starting time column will be displayed.
- Show Navigation – If you activate this option, the weekly schedule will display navigation arrows, which allow moving back and forward between weeks.
Events Carousel Options
If you select the Events Carousel schedule style, the filter options will be replaced with several custom options, that are relevant only to the carousel.
- Show Navigation Arrows – You can use this option to display or hide navigation arrows on the left and right side of the carousel.
- Show Dots Arrows – You can use this option to display or hide navigation dots below the carousel.
- Enable Autoplay – You can use this option to activate the autoplay for the carousel.
- Enable Loop Play – You can use this option to activate the loop for the carousel.
- Autoplay Speed – You can use the select box to choose a speed level for the carousel autoplay: Fast 1-4, Normal or Slow 1-5.
- X-Large / Large / Medium / Small Devices Items – Use these select boxes to choose the number of elements to be displayed on the carousel on very large/ large / medium / small screen devices.
- Distance Between Items – Use this select box to choose the space in pixels between two carousel elements.
- Stage Padding – Use this select box to choose the padding of the carousel.
- Carousel Bg / Nav Color – Besides text and special color, the carousel elements accept a background and a navigation color.
Masonry Grid Options
If you select the Masonry Grid schedule style, you can choose how many elements should be on a grid line, for each screen size.
- Large / Medium / Small Devices Items – Use these slide bars to select the number of elements to be displayed on a grid line on large / medium / small screen devices.
- Grid Item Bg Color – Besides text and special color, the grid elements accept a background color.
Countdown Options
- Show Starting Date – Use this option to display or hide the starting date.
- Vertical Countdown – Activate this option to replace the horizontal display with a vertical one.
- Show Image – Activate this to make the countdown box background the featured image.
- Image Position – If you use an image as background, you can use this select box to choose its position in the box.
- Overlay Opacity – Use this slide bar to change the opacity for the countdown box.
- Background Color – Choose the background color of the countdown box.
Cover Options
- Cover Aspect Ratio – Use this select box to choose the aspect ratio. Available options are: 16:9, 16:9 vertical, 4:3, 4:3 vertical and 1:1.
- Text Position / Align / Size – Use these select boxes to customize how the text will be displayed in the cover box.
- Color Overlay Layer – You can choose between an image or a text overlay layer. The image displayed is the featured image, which you can upload in the class page.
- Overlay Opacity – Use this slide bar to change the opacity for the cover box.
- Overlay Color – Choose the overlay color of the cover box.
Monthly Calendar Options
- Detailed View Position – Use this select box to choose the position of the classes list in the calendar. Available options are Left of the calendar, Right, Below or Inside the calendar.
- Border Style – Use this select box to choose the borders display in the calendar. Available options are No borders, Horizontal, Vertical or All borders.
- Day Names Format – Use this select to choose how the day names will be displayed. Available options are full name (Monday), small name (Mon) or tiny name (M).
- Show Weekends – Use this to hide or display weekends in the calendar.
- Alternate Rows – Use this to activate or deactivate an alternate rows color effect in the calendar.
- Round Day Highlight – Use this to activate or deactivate a bullet day highlight in the calendar.
- Selected Day – Choose the selected day color in the calendar.
Booking
To enable the booking functionality, you need to install and activate WooCommerce plugin. If you do not have WooCommerce installed, you can see the product page here and find out more information about it. Also, you can read the WooCommerce instructions and documentations here.
Note: If you are using Events Schedule on a WP Multisite, you should make sure the WooCommerce plugin is not network activated. For the Events Schedule booking functionality to work correctly, WooCommerce needs to be activated individually for each site in the Multisite.
Creating Tickets
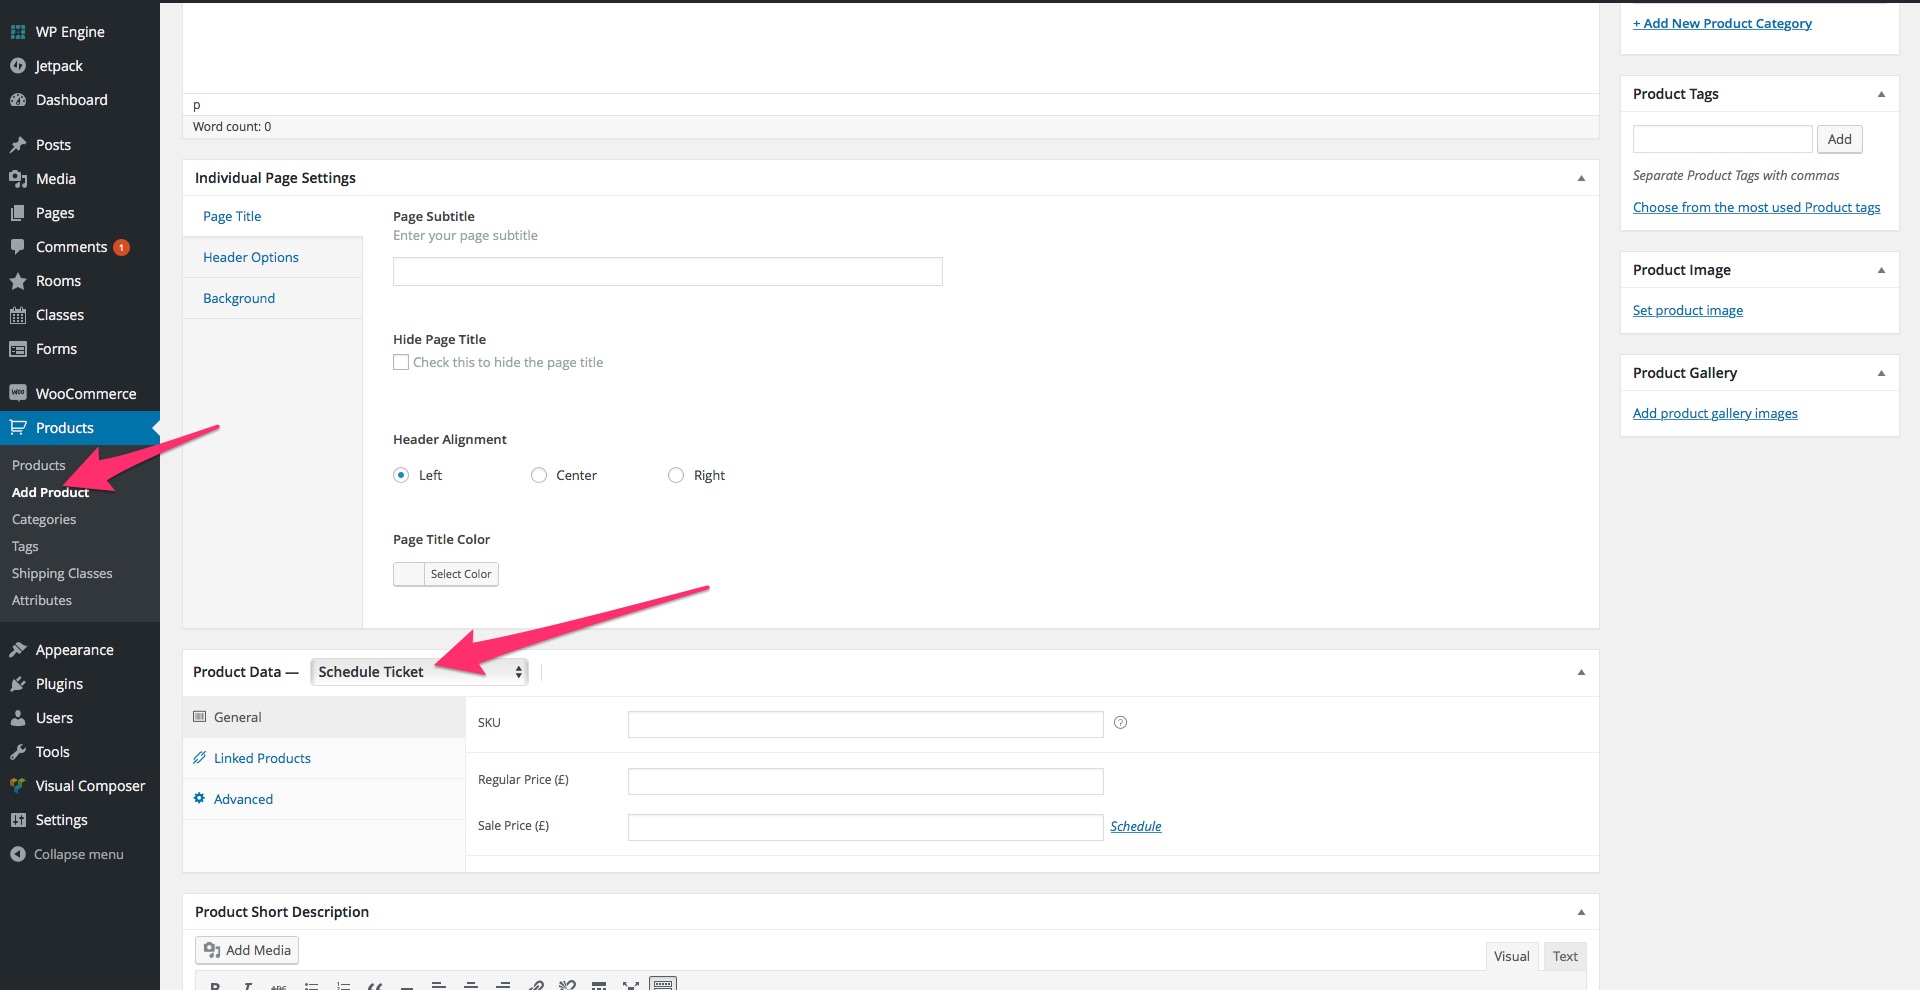
Schedule Ticket
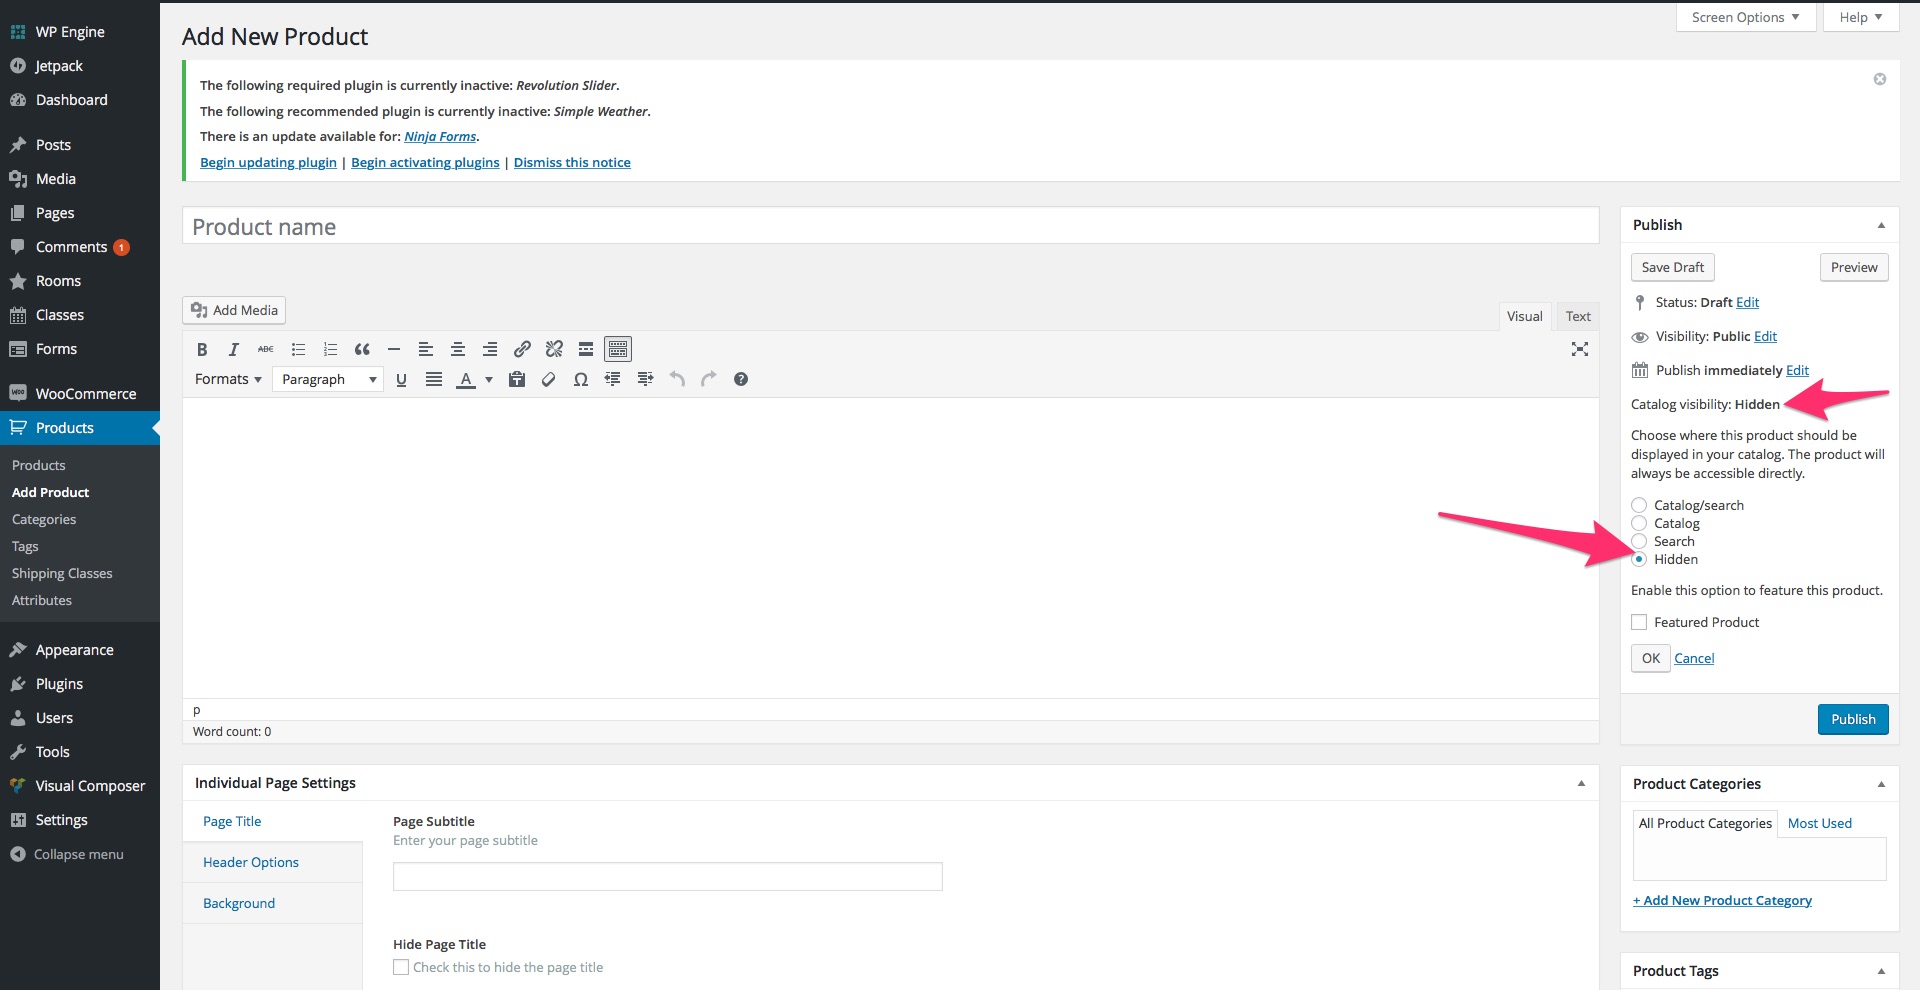
If you have WooCommerce active on your platform, you should see the tab Products in your dashboard, right below the tab WooCommerce. Go to Products > Add Product and scroll down to the Product Data section and select Schedule Ticket as the type of product, to create tickets for your classes.
The Schedule Ticket is a custom type of product that allows only basic options in the Product Data section. You can use the General tab to set the SKU and the price.
NOTE: You should use the Catalog Visibility option, from the Publish options box at the top right, to set the product as Hidden. This is a mandatory option to ensure the correct functionality of the booking feature.
Catalog Visibility
Assigning Tickets to Classes
WooCommerce Tickets Tab
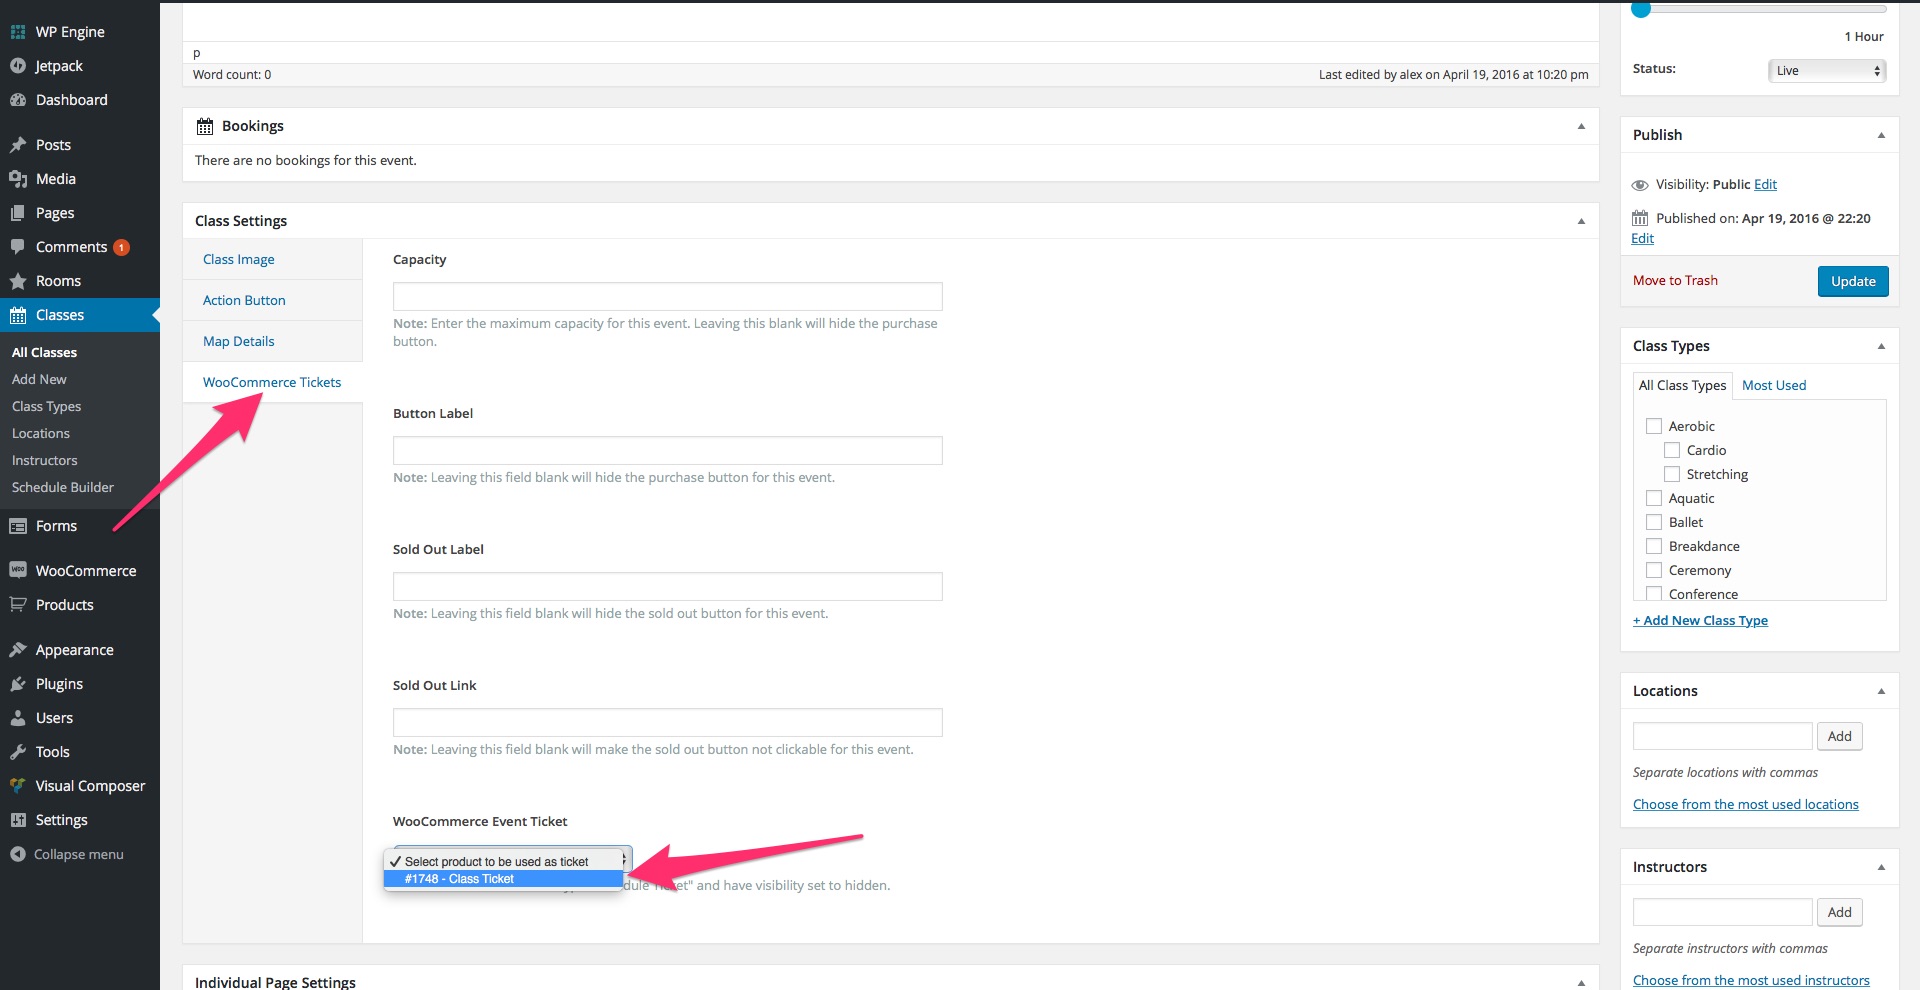
After you have created at least one ticket, you can edit your classes and assign it. Edit the class and scroll down to Class Settings section and click on the WooCommerce Tickets tab. You can customize it with the following options:
- Capacity – Use this field to type in the number of tickets you have available for this class. After all of them are booked, tickets for this class will no longer be available. If you leave this field empty, the booking functionality will not be active for this class.
- Button Label – Type in the name of your Booking button. If you leave the field empty, the button will not be displayed.
- Sold Out Label – Type in the name of your Booking button when tickets are no longer available. If you leave the field empty, the button will not be displayed after all tickets are booked.
- Sold Out Link – If you wish to add a link to the Sold Out button, you can type it here. If you leave the field empty, the button will not be clickable.
- WooCommerce Event Ticket – Use this select box to assign a ticket for the class. NOTE: You should first create, in the Products tab, a Schedule Ticket with the Catalog visibility as Hidden. A place in your class will have the price that you set for the ticket.
Bookings Settings
You can access the general Event Schedule Bookings options panel at WooCommerce > Settings > Event Schedule Bookings. The following options are available:
- Event Date / Types / Instructors / Locations Label – Use these fields to customize the labels in the Cart, Checkout & Thank you pages. If you leave the fields empty, the labels will be hidden.
- Redirect after “Add Ticket to Cart” – You can use this select box to choose the page where visitors will be redirected after adding a ticket in their cart. Available options are Cart Page or Checkout Page.
- Capacity Error Message – Use this field to type in a custom message to be displayed when visitors try to purchase tickets to a sold out event.
Bookings List
You can go at Classes > Bookings to see a list with all classes that have at least one booking made by your clients. The top left field allows you to search classes by name. You can also use the calendar field to filter the classes display by starting date. With the Show Finished option you can show or hide past classes. The classes list shows the following info:
- Class – This column displays the class name. You can click on the name to access the class page.
- Starting – This column displays the starting date and time of the class. You can use it to sort classes chronologically.
- Class Types / Locations / Instructors – These columns display the taxonomy tags assigned to the class. You can click on them to access the taxonomy description.
- Occupancy / Booking / Capacity – These columns display info about the class booking status: how full is the class, how many bookings were made and the total capacity.
You can use the arrow on the last column to reveal the list of bookings for that particular class, with the following info:
- ID – This column displays the order ID. You can click on the name to access the order page.
- Status – This column displays the status of the order. You can use it to sort by status.
- Order Date – This column displays the date and time of the order. You can use it to sort orders chronologically.
- Full Name / Email / Phone – These columns display info about the client: his name, email address and phone number.
- Quantity – This column displays the number of tickets booked through the order.
FAQ
1. How can I populate the timetable with events?
You can fill the timetable by adding Classes, just like you would add regular WP posts. Go to Classes > Add New to create new entries. If you can’t find the Classes options panel in the dashboard, on the left sidebar, you need to activate the plugin.
2. How can I make a class to be scheduled for every week, at the same time?
When you add a new Class, from the Schedule Class options box on the right, you can choose the date and the time. Next to the starting time select boxes, you can find a select box that makes the class Repeat Weekly. If you select this option, the class will be scheduled for every week, at the same time, with the same settings. You can also set the class to be repeated Daily, Every Two Weeks, Monthly or Yearly.
3. Can I show a class as canceled in the timetable?
Yes, if you check the box Show this event as canceled. When editing a Class, you can find the check box on the Schedule Class options panel, on the right. If it is a class that is repeated weekly, all classes will appear as canceled. Classes displayed as canceled are distinctly marked in the timetable, usually with a shadow effect.
4. Is there a limit to how many Class Types, Locations or Instructors I can assign to a Class?
The plugin does not limit how many you can assign, but you should take in to consideration how this will affect the timetable design.
5. How can I display the timetable through shortcode?
After you create a timetable in the Schedule Builder, a shortcode will be auto-generated and it will be displayed on the top-right corner of the builder, left to the How many days to show? option. The shortcode will have a simple structure, something like [wcs-schedule id=1] and you can place it in any area that accepts shortcodes.
6. How can I display the timetable with Visual Composer?
After you create a timetable in the Schedule Builder, you can add it in your page just like you would add any other Visual Composer element. Look for the Weekly Class Schedule element in the list. The element will display a select box, for an easy integration.
7. Can I choose another layout for the timetable?
You can choose one of the 12 available styles. All layouts can display almost the same amount of information, only the style is different. You should try all to decide which one is the right one for your business. You can, of course, use multiple schedules with different styles, if you wish.
8. Can I display a different image for each of my classes?
Yes, you can assign a featured image for each class and it will be displayed in the pop-up modal window. Still, if you want to display the images in the schedule, you will have to use the Plain List schedule style, as this is the only one designed for image display. The Events Carousel, Monthly Calendar and Masonry Grid can display images also.
9. Do I have any interactions available for my classes?
Yes, you can create a custom Call-to-action button with one of the several available functions: internal or external link, mail to function and iCal Event. These functions allow visitors to send reservation mails, add the class directly to their calendar or visit a custom page for the event.
10. Can I display custom content for Instructors, Locations or Class Types?
Yes, you can add a description that will be displayed in a pop-up, when clicking on the Instructor / Location / Class Type name in the schedule. Also, you can make it a link, if the Description field’s content is just an URL.
11. How can I display a schedule with only some of my classes?
When you create one in the Schedule Builder, you can define the classes with the help of the Schedule Contents tabs. If you select only several Class Types / Locations / Instructors, then only the classes assigned with a selected Class Type / Location / Instructor will appear.
12. How can I change the starting day of the schedule?
The starting day of the schedule, depending on the schedule style, is either the current day or the first day of the week, according to your WordPress settings. For the Weekly Schedule style, if you change the first day of the week at Settings > General > Week Starts On, the change will reflect in the schedule display.
13. How can I change the time displayed for my classes to a 12-hour AM / PM clock?
You can choose between 12-hour clock and 24-hour clock for each schedule individually, in the Schedule Builder. On the right side, under the Display Options section, you can find the Show 12-hour Clock switcher. Turning this option On will switch your schedule to a 12-hour AM / PM clock. You have an option for this for the class page also, at Classes > Settings.
14. How can I export / import my schedules?
In the Classes > Schedule Builder tab, under the schedules list, you will find the Backup Options button. Clicking this will display a set of buttons. If you wish to export your schedules, you can click on the Download Backup button and your data will be saved in a JSON file. You can then easily import the data by clicking on the Choose File button, browsing and selecting the JSON file and then clicking on the Import Backup Button.
15. How can I use a color for a particular class?
You can change the color of a class in the schedule by assigning a Class Type to that class and assigning a custom color to that Class Type. The coloring style will depend on the Schedule Style used, as each style has its own particular way to display colored classes. The color of the class will override the color of the parent class. Another method is through color coding the days. You can use the Weekdays Coloring tab in the Schedule Builder to assign a color for a specific day.
16. How can I set a map for a particular class?
You can assign a map individually for each class, through the Map Details tab, right below the content area. The map will be displayed in the pop-up modal window and it will appear only if you set a valid value for latitude and longitude coordinates.
17. How can I customize the design on my Events Carousel elements?
The Events Carousel schedule style doesn’t have filters, but it allows some additional graphical customizations. In the Schedule Builder, you can choose a background color for the elements and you can edit the Class post to add an Excerpt. If you don’t use Excerpt, the carousel will display the first lines of text in the class description.
18. How can I make multiple copies of a class?
In the Classes list, if you mouse over a class you will display the Duplicate Class button. Clicking on this button will create a copy of that class, with the same starting date, description, taxonomies, featured image, etc. You can edit this copy to change what you need and create similar classes very fast.
19. What do I need to set up booking for my classes?
Our booking functionality works through WooCommerce products, so you need to install and activate the WooCommerce plugin on your platform. You don’t need to do any special customizations for WooCommerce, it will work fine with the default settings.
20. How should I create a ticket for my classes?
The ticket is an WooCommerce product. When you create the product, you should go at Product Data and set it as a Schedule Ticket. You should also use the Catalog Visibility option to set it as Hidden. It is important to select both these options. Otherwise you will not be able to use this ticket for your classes.
21. Why can’t I see my classes in the Weekly Schedule or Weekly Tabs styles?
If your classes are visible with other styles but are not displayed in the Weekly Schedule or Weekly Tabs styles, this is most likely caused by the classes starting time. These styles always show just the next 7 days. Therefore, your classes need to be scheduled between today and same time next week to be displayed.
22. How can I display today classes in the Weekly Schedule or Weekly Tabs styles?
By default, these styles will not display today classes. In the current day of the week column / tab, the next week classes will be displayed. If you wish to show today and not next week, you need to activate Show Past Events option in the schedule builder.
23. How can I activate the pop up window or class page for my classes?
First, you need to make sure the Show Description option is activated in your schedule builder. If you are using the Plain List style, you also need to type in a string for Info Button Label, to display the button. This should reveal the Modal Options in the schedule builder, which will allow you to customize the class pop up window. Second, your classes need to have content to display a modal. If you wish to replace the modal with a class page, you need to choose Disabled under Modal Options and go at Classes > Settings to activate the class page. If the class page URL doesn’t work, you should go at Settings > Permalinks and save the settings to reset permalinks.
24. How can I reorder the filters?
For this, you will need to add some code in your theme’s Custom CSS field in the Customizer. To reorder the filters, you can use the following code:
.wcs-filters--wcs_type{order:1}

.wcs-filters--wcs_room{order:2}

.wcs-filters--wcs_instructor{order:3}

.wcs-filters--day_of_week{order:4}

.wcs-filters--time_of_day{order:5}
where the number is the priority in the filters order.
25. How can I remove some of the days from the Day of the Week filter?
For this, you will need to add some code in your theme’s Custom CSS field in the Customizer. The following code:
.wcs-filters--day_of_week .wcs-filters__filter-wrapper:nth-child(4){display:none !important}
will remove day number 4, Thursday in this case. If you want to remove more days, you need to add the code again, with a different number.
26. How can I remove the blinking effect for the time display?
For this, you will need to add some code in your theme’s Custom CSS field in the Customizer. The following code:
.wcs-addons--blink{animation: none !important;-webkit-animation:none !important;}
will display the dots between hour and minutes without the blinking effect.
27. How can I make my masonry grid elements open with one click?
For this, you will need to add some code in your theme’s Custom CSS field in the Customizer. The following code:
 .wcs-class__click-area.wcs-class__click-area.wcs-class__click-area{display: none !important;}
 .wcs-class__excerpt.wcs-class__excerpt{display: block !important}
will remove the expanding step for the grid elements and they will open with the first click.
28. How can I make the month column, in the Plain List style, be a fixed size?
By default, the month column will adjust its length to the month name string. If you want to make it the same fixed size, you will need to add some code in your theme’s Custom CSS field in the Customizer. Use the following code:
.wcs-timetable--list .wcs-class__time{ flex-basis: 120px }
and choose the value in pixels for your Month column.
29. Why can’t I see my multi-day event displayed in the schedule?
Because this type of events stretch over several days, they can not be displayed in schedule styles with a daily design. If you can’t see a multi-day event, you should switch the schedule style to Plain List, Events Carousel or Masonry Grid. The individual event styles, Countdown and Cover, can also display multi-day events.
30. How can I sort simultaneous classes?
The plugin sorts classes by starting date, so if you have simultaneous classes (same starting hour and minutes), you need to use seconds. When creating or editing a class, you can set seconds with the last select box of the Starting Date & Time options.
Moment.js date format
| Token | Output | |
|---|---|---|
| Month | M | 1 2 … 11 12 |
| Mo | 1st 2nd … 11th 12th | |
| MM | 01 02 … 11 12 | |
| MMM | Jan Feb … Nov Dec | |
| MMMM | January February … November December | |
| Quarter | Q | 1 2 3 4 |
| Qo | 1st 2nd 3rd 4th | |
| Day of Month | D | 1 2 … 30 31 |
| Do | 1st 2nd … 30th 31st | |
| DD | 01 02 … 30 31 | |
| Day of Year | DDD | 1 2 … 364 365 |
| DDDo | 1st 2nd … 364th 365th | |
| DDDD | 001 002 … 364 365 | |
| Day of Week | d | 0 1 … 5 6 |
| do | 0th 1st … 5th 6th | |
| dd | Su Mo … Fr Sa | |
| ddd | Sun Mon … Fri Sat | |
| dddd | Sunday Monday … Friday Saturday | |
| Day of Week (Locale) | e | 0 1 … 5 6 |
| Day of Week (ISO) | E | 1 2 … 6 7 |
| Week of Year | w | 1 2 … 52 53 |
| wo | 1st 2nd … 52nd 53rd | |
| ww | 01 02 … 52 53 | |
| Week of Year (ISO) | W | 1 2 … 52 53 |
| Wo | 1st 2nd … 52nd 53rd | |
| WW | 01 02 … 52 53 | |
| Year | YY | 70 71 … 29 30 |
| YYYY | 1970 1971 … 2029 2030 | |
| Y | 1970 1971 … 9999 +10000 +10001
Note: This complies with the ISO 8601 standard for dates past the year 9999 |
|
| Week Year | gg | 70 71 … 29 30 |
| gggg | 1970 1971 … 2029 2030 | |
| Week Year (ISO) | GG | 70 71 … 29 30 |
| GGGG | 1970 1971 … 2029 2030 | |
| AM/PM | A | AM PM |
| a | am pm | |
| Hour | H | 0 1 … 22 23 |
| HH | 00 01 … 22 23 | |
| h | 1 2 … 11 12 | |
| hh | 01 02 … 11 12 | |
| k | 1 2 … 23 24 | |
| kk | 01 02 … 23 24 | |
| Minute | m | 0 1 … 58 59 |
| mm | 00 01 … 58 59 | |
| Second | s | 0 1 … 58 59 |
| ss | 00 01 … 58 59 | |
| Fractional Second | S | 0 1 … 8 9 |
| SS | 00 01 … 98 99 | |
| SSS | 000 001 … 998 999 | |
| SSSS … SSSSSSSSS | 000[0..] 001[0..] … 998[0..] 999[0..] | |
| Time Zone | z or zz | EST CST … MST PST
Note: as of 1.6.0, the z/zz format tokens have been deprecated from plain moment objects. Read more about it here. |
| Z | -07:00 -06:00 … +06:00 +07:00 | |
| ZZ | -0700 -0600 … +0600 +0700 | |
| Unix Timestamp | X | 1360013296 |
| Unix Millisecond Timestamp | x | 1360013296123 |
Quick Troubleshooting
The schedule is not displayed
- Choose the Monthly Calendar style. If the schedule does not appear in the page, you should first make sure there is no local conflict. You should test by choosing the Monthly Calendar style in the schedule builder, because this style should display a schedule even if there are no eligible classes. If the calendar is displayed, the issue is related to classes selection. If the calendar is not displayed, you probably have a local conflict.
- Activate Lazy Load and JS before footer. Go at Classes > Settings > Advanced and activate Lazy Load and Insert Javascript Templates before Footer options. Activating these might help fix local conflicts.
- Deactivate other plugins. You should access your Plugins tab and temporary deactivate other third party plugins. If the schedule appears in page, then you should start reactivating plugins, one by one, to identify the source of the conflict.
- Activate the default WP theme. You should go at Appearance > Themes and activate one of the default WP themes, like Twenty Seventeen. If the schedule appears in page, the conflict is with your theme.
Classes are not displayed in the schedule
- Select Show All Days. Use the How many days to show select box, in the schedule builder, to choose Show All Days. If classes are displayed now, you need to adjust either their starting dates or the period of time the schedule will display. If you want to use Weekly Schedule or Weekly Tabs, your classes need to start in the next 7 days to be displayed.
- Clear Contents selection. Check the Class Types, Locations and Instructors checkboxes, under Contents, in the schedule builder. If you have boxes checked, clear the selection. If classes are displayed now, you need to assign types, locations or instructors to your classes, if you want to have schedules with different selections.
- Choose the Plain List style. This style will display any class, with the correct settings. If classes are displayed now, check if their starting date is correct and if they are set as multi-day. You can display multi-day events only in the Plain List, Masonry Grid and Events Carousel styles. For the other styles, you need to use Repeat Daily events.
- Activate Show Past Events. In the schedule builder, under Display Options, activate Show Past Events. Then, use the date picker calendar to select a date in the distant past, like 2-3 years ago. If classes are displayed now, check if you have any classes that are not already finished.
Classes do not open a description
- Activate Show Description. In the schedule builder, under Display Options, activate Show Description. This will reveal Modal Options, at the bottom of the options sidebar, which allow you to customize the pop up window display. If you want to use a page instead of a pop up window, you should choose Disabled, under Modal Options.
- Check Classes Content. The pop up window will be disabled if classes do not have any content. You should edit the class page and add at least one word in the class description.
- For Plain List add the button. If you are using the Plain List style, you also need to add a label for the button which opens the description. The name of the button needs to be added in the Info Button Label field, at the bottom of the schedule builder.
The Event Page is not working
- Activate Single Page. You should go at Classes > Settings > General and activate Event Single Page. This will make your class pages have a URL.
- Reset Permalinks. If the class pages return a 404 error, go at Settings > Permalinks and save settings. This will reset permalinks and should fix it.
Date or Time Format is not correct
- Check the Date Format of the schedule. Most schedule styles will display a Date Format field in the schedule builder, under Display Options. This field is only for the display inside the schedule and uses Moment.js date format. If the style does not display a Date Format field, then its date display can be modified only through the PHP template file, which we cover in the Developers Documentation chapter.
- Check the Date Format of the modal window. The pop up window has its own Date Format field, under Modal Options, which also uses Moment.js date format. It is available for all schedule styles.
- Check the Date Format of the event page. The page has its own Date Format field, at Classes > Settings > Event Page, which uses WP date formatting. It is available for all schedule styles.
- Check Show 12-hour Clock option. If you want to change the time format display in the schedule, use the Show 12-hour Clock option in the schedule builder, under Display Options. The modal window will inherit the time format settings. For the page, you need to use the 12h Time Format option at Classes > Settings > Event Page.
Developers Documentation
Templates
If you wish to customize the display of the schedule styles, filters, pop up windows, event page or other front-end elements, you need to edit the PHP files inside the Templates folder. In your Child Theme root folder, you should create wcs_templates folder and a similar path to the PHP file with the default one. If, for example, you wish to customize the Events Carousel schedule style, you should create the following structure: wcs_templates > display > carousel.php. For the event page, you should create the structure: wcs_templates > single > content.php. The Templates folder contains the following PHP files:
Display Folder
- Carousel.php – Use this file to customize the Events Carousel style display.
- Countdown.php – Use this file to customize the Countdown style display.
- Cover.php – Use this file to customize the Cover style display.
- Daily-agenda.php – Use this file to customize the Daily Agenda style display.
- Grid.php – Use this file to customize the Masonry Grid style display.
- List-compact.php – Use this file to customize the Compact List style display.
- List-large.php – Use this file to customize the Large List style display.
- List-plain.php – Use this file to customize the Plain List style display.
- Monthly-calendar.php – Use this file to customize the Monthly Calendar style display.
- Timeline.php – Use this file to customize the Timeline style display.
- Weekly-schedule.php – Use this file to customize the Weekly Schedule style display.
- Weekly-tabs.php – Use this file to customize the Weekly Tabs style display.
Filters Folder
- Filter-radio.php – Use this file to customize the display of a radio type filter. This is used for the Masonry Grid style.
- Filter-switch.php – Use this file to customize the display of a switch type filter.
- Filter-title.php – Use this file to customize the titles display of the filter.
- Filter.php – Use this file to customize the display of a checkbox type filter.
- Filters-default.php – Use this file to customize the general display of the filters.
- Filters-grid.php – Use this file to customize the general display of the Masonry Grid filters.
Misc Folder
- Button-more.php – Use this file to customize the display of the Show More Classes Button.
- Loader.php – Use this file to customize the display of the classes loader.
Modal Folder
- Modal-large.php – Use this file to customize the display of the Large Modal pop up window.
- Modal-taxonomy.php – Use this file to customize the Type, Instructor and Location taxonomies display in the pop up window.
- Modal-wrapper.php – Use this file to customize the wrapper lightbox display of the pop up window.
- Modal.php – Use this file to customize the display of the Small Modal pop up window.
Single Folder
- Buttons.php – Use this file to customize the buttons display in the event page.
- Content.php – Use this file to customize the content display in the event page.
- Date.php – Use this file to customize the starting time box display in the event page.
- Image.php – Use this file to customize the feature image display in the event page.
- Map.php – Use this file to customize the map display in the event page.
WP Hooks
You can apply Hooks functions to Actions or Filters, to change the default functionality. You can read this article: http://www.wpbeginner.com/glossary/hooks/ to learn more about WP Hooks. In Events Schedule plugin we use only Filters:
wcs_views
We use the wcs_views filter to add, remove or modify schedule styles in the schedule builder. This filter returns an array, with array items with the following parameters:
- value – The ID number of the schedule style. We are using 0-12 for our included schedule styles. This is a mandatory parameter.
- title – The name of the style in the schedule builder. Ex: Compact List, Weekly Tabs. This is a mandatory parameter.
- icon – The icon of the style in the schedule builder. You can use Themify icons like this: ti-layout-list-post. This is a mandatory parameter.
- slug – The slug of the style in the plugin code. Ex: monthly-schedule A PHP template file with this name should be created in the Display folder. This is a mandatory parameter.
- mixins – You can use this parameter to add custom JS to the schedule style. Ex: wcs_timetable_monthly_mixins
- deps – You can use this parameter to add external files to schedule style, like JS libraries. The plugin will try to enqueue_script, only if you also register it with wp_register_script Ex: wcs-fullcalendar
After adding a new schedule style with the wcs_views filter, you can use the filters wcs_views_value_colors, wcs_views_value_labels and wcs_views_value_options to add new custom colors, labels and options to the style. The value in the wcs_views_value_colors filter should be the number set in the wcs_views value parameter. Example: wcs_views_13_colors These 3 filters also return an array, with array items with the following parameters:
wcs_views_value_colors
- id – The ID of the color in the plugin code. Ex: color_mth_selected
- title – The name of the color option in the schedule builder. Ex: Selected Day
- default – The default value of the color option. Ex: #BD322C
All parameters are mandatory.
wcs_views_value_labels
- title – The name of the label field in the schedule builder. Ex: Next Label
- id – The ID of the label in the plugin code. Ex: label_mth_next
- placeholder – The placeholder for the field in the schedule builder. Ex: Next
- default – The default value of the label. Ex: Next
All parameters are mandatory.
wcs_views_value_options
There are 4 types of options available in the schedule builder: select box, switcher, text field and slider bar. You can add them with the following parameters:
Select Box
- id – The ID of the option in the plugin code. Ex: mth_cal_agenda_position
- title – The name of the option in the schedule builder. Ex: Detailed View Position
- type – Use the value ‘select’ for a select box option.
- options – The array with the available choices of the select box. Ex: array( 0 => __( ‘Below the calendar’), 1 => __( ‘Left of calendar’), 2 => __( ‘Right of calendar’), 3 => __( ‘Inside the calendar’ ) )
- value – The default value of the select box. In our example, 0 would be Below the calendar choice.
Switcher
- id – The ID of the option in the plugin code. Ex: mth_cal_show_weekends
- title – The name of the option in the schedule builder. Ex: Show Weekends
- type – Use the value ‘switch’ for a on/off switcher option.
- value – The default value of the switcher. Available options are true or false.
Text Field
- id – The ID of the option in the plugin code. Ex: mth_cal_date_format
- title – The name of the option in the schedule builder. Ex: Date Format
- type – Use the value ‘text’ for a text field option.
- value – The default value of the field. Ex: MMMM DD
Slider Bar
- id – The ID of the option in the plugin code. Ex: cover_overlay
- title – The name of the option in the schedule builder. Ex: Overlay Opacity
- type – Use the value ‘slider’ for a slider bar option.
- value – The default value of the field. Ex: 10
- atts – The array with the parameters of the slider bar. The available parameters are: min (the minimum value), max (the maximum value), step (the increment value) and suf (the suffix of the value). Ex: array( ‘min’ => 0, ‘max’ => 100, ‘step’ => 1, ‘suf’ => ‘%’))
All parameters are mandatory.
wcs_tax_labels
We use the wcs_tax_labels filter to add, remove or modify taxonomy labels in the plugin admin. In this filter, you need to add two parameters, the value to be filtered and the taxonomy: wcs-type, wcs-room or wcs-instructor. You can use the default WP arguments for taxonomies: https://codex.wordpress.org/Function_Reference/register_taxonomy#Arguments
wcs_post_type_labels
We use the wcs_post_type_labels filter to add, remove or modify the labels of our custom post type, Classes. You can use the default WP arguments for labels: https://codex.wordpress.org/Function_Reference/register_post_type
wcs-excerpt
We use the wcs_excerpt filter to add, remove or modify the classes excerpt. It has only one parameter, that you can use to change the way the plugin generates the excerpt.
wcs_register_templates_filters
We use the wcs_register_templates_filters filter to add, remove or modify templates for filters modals and miscellaneous, like this;
$array['filters'] = array(
 'checkbox' => wcs_get_template_part( 'filters/filter' ),
 'switch' => wcs_get_template_part( 'filters/filter', 'switch' ),
 'radio' => wcs_get_template_part( 'filters/filter', 'radio' ),
 //‘select2’ => wcs_get_template_part( 'filters/filter', 'select2' )
 );

$array['modals'] = array(
 'wrapper' => wcs_get_template_part( 'modal/modal', 'wrapper' ),
 'normal' => wcs_get_template_part( 'modal/modal' ),
 'large' => wcs_get_template_part( 'modal/modal', 'large' ),
 'taxonomy' => wcs_get_template_part( 'modal/modal', 'taxonomy' )
 );

$array[‘misc’] = array(
 'more' => wcs_get_template_part( 'misc/button', 'more' ),
 'loader' => wcs_get_template_part( 'misc/loader' )
 );
wcs-start and wcs_stop
We use the wcs_start and wcs_stop filters to set the starting and ending date of the schedule. You should add these filters if you wish to use a Weekly Schedule or Weekly Tabs schedule style to display a week in the distant future, like this:
add_filter( 'wcs_start', 'myy_custom_start_date', 30, 2 );
function myy_custom_start_date( $date, $options ){
 if( intval( $options['id'] ) !== 44 )
 return $date;
 return strtotime('02/19/2018');
}
add_filter( 'wcs_stop', 'myy_custom_stop_date', 30, 2 );
function myy_custom_stop_date( $date, $options ){
 if( intval( $options['id'] ) !== 44 )
 return $date;
 return strtotime('02/25/2018');
}
where you need to replace the 44 with the id number of your schedule and the 02/19/2018 and 02/25/2018 dates with your starting and ending date, in this format.
Class Object
In the class object we store an array with the following string, boolean and numeric values:
- duration – The duration of the class, type string. Ex: 5h, 45′
- end – The ending time of the class, type string. Ex: 2019-01-01T06:00:00+00:00
- ending – For multi-day events, the end date of the event in Unix timestamp, type string. Ex: 1526026800
- excerpt – The excerpt of the class, type string.
- finished – The status of the class, type boolean.
- future – Classes which did not start yet are considered future classes, type boolean.
- hash – The unique ID of the class instance, type string.
- id – The custom post ID, type numeric.
- last – For classes without a last repeat date, type boolean with value false. For repeatable classes with a last repeat date, the date in Unix timestamp, type string.
- multiday – If the class is set as a multi-day event, type boolean.
- period – The duration of the class, in minutes, type numeric.
- permalink – The permalink of the class, type string.
- start – The starting time of the class, type string. Ex: 2019-01-01T06:00:00+00:00
- thumbnail – The URL of the class featured image, type string. If the class does not have a featured image, type boolean with value false.
- timestamp – The starting time of the class in Unix timestamp, type string.
- title – The title of the custom post, type string.
- visible – If the class is visible or canceled, type boolean.
we also store a few object values: buttons, meta and terms.
In the buttons object we store the values for the Action Button and the Booking Button. The main object stores an array for the Action Button with the following values:
- custom_url – The URL of the action button, type string. If the button does not have a URL assigned, type boolean with value false.
- email – The mailto address of the action button, type string. If the button does not have a mailto address assigned, type boolean with value false.
- ical – The add to iCal URL of the action button, type string. If the button does not have an add to iCal URL assigned, type boolean with value false.
- label – The action button label, type string.
- method – The ID number of the option selected as the button action, type numeric. Go to page is 0, Go to custom URL is 1, Email is 2, Download iCal event is 3.
- permalink – The Go to page URL of the action button, type string. If the button does not have a Go to page URL assigned, type boolean with value false.
- target – If the URL of the action button opens the target in a new window, type boolean.
The woo object stores an array for the Booking Button with the following values:
- classes – The CSS classes of the button, type string.
- href – The Add to Cart URL of the class instance, type string.
- label – The booking button label, type string.
- status – The status of the button, type boolean. It will be true for a regular booking button and a sold out button with a custom URL. It will be false only for a sold out button without a custom URL.
The meta object will store custom fields. If you wish to add a custom field, we recommend installing Advanced Custom Fields plugin. Your field should be named like this: _wcs_fieldname to be displayed in the meta object.
The terms object stores taxonomies, as objects: wcs_instructor, wcs_room and wcs_type. These taxonomies objects store the following values:
- desc – If the taxonomy has a Custom URL assigned, type boolean.
- id – The ID number of the taxonomy.
- name – The taxonomy title.
- slug – The taxonomy slug.
- url – The custom URL assigned to the taxonomy, type string.
Adding a Custom Field in Vue JS Object
If you wish to add a custom field in a class pop up window or schedule, you need to do it through Vue JS. First, you need to add the field in a PHP file of your child theme, like in this example:
Events Schedule Custom Taxonomy
Then, you can add it in a pop up window with {{data.my_custom_field}} or in a schedule using {{event.meta.my_custom_field}}
Credits
The Weekly Class Schedule Plugin was developed by Curly Themes. Here is a list of credits and attributions:
- Handlebars JS by wycats
- Themify Icons by Themify
- Formstone Tooltip Js by Formstone
- Ladda by hakimel
- matchHeight JS by liabru
- Patternbolt by buseca
Release Notes
- Events Schedule 2.6.0
-
- Fixed a compatibility issue with new WooCommerce versions related to the product name displayed in the WooCommerce cart.
- Fixed an issue with special characters in the Schedule Title.
- Fixed several compatibility issues with Fusion builder in the single event page.
- Improved compatibility with object caching tools for the single event page.
- Minor bug fixes.
- Events Schedule 2.5.14
-
- Fixed an issue with the Daily Agenda display after using filters.
- Fixed an issue with special characters in the Action Button label.
- Minor bug fixes.
- Events Schedule 2.5.10
- Fixed an issue with the Countdown display for events in the distant future.
- Fixed an issue with the mailto functionality for events with special characters in the title.
- Addressed a conflict between the add to iCal functionality and Yoast plugin.
- Minor bug fixes.
- Events Schedule 2.5.9
- Fixed an issue with the day selection in the Weekly Tabs style display, while using filters.
- Fixed an issue with the option to delete canceled dates.
- Fixed an issue with the Bookings tab on particular platforms running WP 5.0+.
- Fixed an issue with the Monthly Calendar style script on particular platforms running WP 5.0+.
- Addressed several minor compatibility issues with WP 5.0+, related to schedule scripts.
- Minor bug fixes.
- Events Schedule 2.5.8
- Fixed several compatibility issues with WP 5.0 affecting the Masonry Grid, Monthly Calendar and Timeline style.
- Fixed an issue with the Sunday Color option in the Weekly Schedule style.
- Fixed an issue with the Price field display in the ticket product page.
- Minor bug fixes.
- Events Schedule 2.5.5
- Fixed an issue with the reverse order functionality on daily styles.
- Fixed an issue with the Timeline style starting date display.
- Fixed an issue with the Repeat Custom functionality.
- Fixed an issue with the Weekly Tabs style on particular timezones.
- Added CSS classes for events in the Timeline styles.
- Minor bug fixes.
- Events Schedule 2.5.2.1
- Fixed an issue with the show navigation mode of the Weekly Schedule style.
- Fixed an issue with canceled classes for the Masonry Grid style.
- Minor bug fixes.
- Events Schedule 2.5.2
- Fixed an issue with the Action Button in the event page.
- Fixed an issue with the Weekdays Coloring.
- Fixed an issue with the Repeat Custom dates delete button.
- Minor bug fixes.
- Events Schedule 2.5
- Added Repeat Custom option, which allows custom repeating patterns.
- Added seconds for Starting Date, for ordering simultaneous events.
- Fixed an issue with schedules display on IE browsers.
- Fixed an issue with the no events message in the Carousel style.
- Minor bug fixes.
- Events Schedule 2.4.4
- Made several improvements for WooCommerce integration.
- Fixed an issue with the iCal file download in the single event page.
- Fixed an issue with special characters in the event title in iCal.
- Fixed an issue with the reverse order display in daily list styles.
- Minor bug fixes.
- Events Schedule 2.4.3
- Added a classes search field, for the Countdown and Cover schedule styles.
- Fixed an issue with the show navigation display of the Weekly Schedule style.
- Made several improvements for the Cover schedule style responsiveness.
- Made several improvements for the Large List schedule style responsiveness
- Fixed an issue with the Cover style excerpt display.
- Fixe an issue with the How many events to show option.
- Fixed an issue with the color coding priority.
- Minor bug fixes.
- Events Schedule 2.4.2.2
- Added Enable Caching option, for a better control of how the events are cached.
- Fixed an issue with the bookings capacity of an event.
- Fixed an issue with the Monthly Calendar display if Sunday is first day of the week.
- Made several improvements for the event page responsiveness.
- Adressed a fix for special characters in taxonomies.
- Minor bug fixes.
- Events Schedule 2.4.1
- Added Bookings tab, which displays a list with all your classes with bookings.
- Fixed an issue with the General tab of the WooCommerce products.
- Minor bug fixes.
- Events Schedule 2.3.1
- Added Maximum Years option, which allows setting the maximum years span for schedules.
- Added Reverse Order option, for past events in list, carousel and agenda styles.
- Added Image background option for the Countdown style.
- Added Lazy Load option, which can help speed up the loading time and avoid conflicts.
- Added Insert Javascript Templates before Footer option, which helps avoid conflicts.
- Added an option to activate the archive for the custom taxonomies.
- Fixed an issue with the booking button display in the event single page.
- Fixed an issue related to the Carousel display with one element.
- Fixed an issue related to the Weekly Schedule display with Show Navigation option.
- Fixed a responsiveness issue related to the Large List display.
- Fixed an issue related to the canceled events display on Daily Agenda style.
- Minor bug fixes.
- Events Schedule 2.1
- Added multi-day events, available for Plain List, Events Carousel and Masonry Grid styles.
- Complete rework for the Settings options panel, with Vue JS reactive technology.
- Improved the Monthly Calendar schedule style design for Firefox browsers.
- Fixed an issue with the Monthly Calendar empty days display.
- Fixed a compatibility issue between Masonry Grid style and Ninja Form forms.
- Fixed an issue related to the Masonry Grid style display on Firefox browsers.
- Fixed an issue related to the WooCommerce add to cart functionality.
- Minor bug fixes.
- Events Schedule 2.0.5.6
- Added Group by Starting Hour, a new display mode for Weekly Schedule style.
- Added Show Navigation option, for Weekly Schedule style, that allows browsing back and forward between weeks.
- Fixed an issue that was preventing the instructor pop up from opening through the class pop up.
- Minor bug fixes.
- Events Schedule 2.0.5.2
- Added date and time format conversion for the action button mail functionality.
- Fixed an issue related to the past events display.
- Fixed an issue related to the deactivation of both pop up window and class page.
- Fixed a display issue for Large List schedule styles on IE browsers.
- Minor bug fixes.
- Events Schedule 2.0.5
- Added new schedule styles: Countdown, Cover and Monthly Calendar.
- Added new repeatable options for classes: Daily, Every Two Weeks, Monthly and Yearly.
- Ensured compatibility with WooCommerce 3.0+ versions.
- Fixed a conflict with the pop up window script on some IE browser versions.
- Fixed a bug related to the Date Format field for the Weekly Tabs style.
- Fixed a bug related to weekdays and Class Type color assignation.
- Fixed a bug related to classes with canceled dates.
- Fixed a bug related to the 12 hours time format display.
- Fixed a bug related to the Masonry Grid display on Firefox browsers.
- Minor bug fixes.
- Events Schedule 2.0
Note: Date Format fields now support only Moment.js date formats. If you are updating from a previous version with WP standard date formats, you need to edit the Date Format fields and add a date format according to this table: Moment js date format
- Incompatible API changes. We’ve rewritten both frontend and backend with reactive JS technology. This should improve the general performances of the plugin in terms of speed and usability.
- The Date Format fields support now only Moment.js date formats.
- Added a Date Format field for Large List and Timeline schedule styles.
- Past Events Archive has been replaced with the Show Past Events option, which allows more flexibility.
- Fixed a bug related to WooCommerce Add Ticket to Cart redirect.
- Fixed a bug related to pop up modal window class info.
- Fixed a bug related to language file translation.
- Fixed a bug related to location and instructor content selection in the schedule builder.
- Fixed a bug related to the Class Type children structure.
- Fixed a bug related to Events Carousel navigation.
- Minor bug fixes.
- Weekly Class Schedule 1.8
- Incompatible API changes. We’ve completely rewritten the plugin code to make it more plugable and easier to customize. The front-end filters and schedule builder options are more dynamic now.
- Added the 12 hours clock option for class pages.
- Fixed a bug related to UTC+12 and UTC+13 timezones.
- Fixed a bug related to Timeline, Compact List and Large List styling for Show More classes.
- Fixed a bug related to Action Button mailing functionality.
- Fixed a bug related to the Class Type pop up window.
- Fixed a bug related to Masonry Grid filters.
- Minor bug fixes.
- Weekly Class Schedule 1.7.3
- Added Show Filters Expanded option, that allows loading the schedule with the filters already expanded.
- Fixed a bug related to left and right filters position.
- Fixed a bug related to Google Maps API.
- Updated gmaps3 to 7.1.
- Added the possibility to break lines in the class excerpt.
- Minor bug fixes.
- Weekly Class Schedule 1.7
- Added Class Page functionality, that allows replacing the pop up window with a class page.
- Added Last Repeat Date option, that allows settings a last date for a weekly repeatable event.
- Minor bug fixes.
- Weekly Class Schedule 1.6
- Added Booking functionality, that allows booking tickets through WooCommerce.
- Added Date Format option, that allows changing the date format for Compact List, Weekly Tabs and Events Carousel.
- Fixed an issue with the pop up window info display .
- Fixed an issue with the iCal button.
- Improved the Weekly Schedule style responsiveness.
- Minor bug fixes.
- Weekly Class Schedule 1.4
- Added the Timeline schedule style, that allows classes display in a simple, vertical timeline.
- Added the Canceled Dates option, that allows canceling recurrent future events.
- Added Date Format option, that allows choosing a custom date format for the modal box.
- Added several Modal Options, that allow showing or hiding info in the pop up window.
- Fixed an issue with the Calendar display on certain timezones.
- Fixed an issue with the Type Label display for Large List style.
- Fixed an issue with the map display.
- Minor bug fixes.
- Weekly Class Schedule 1.3.2
- Added the Masonry Grid schedule style, that allows classes display as grid elements.
- Added the Duplicate option, that allows creating multiple copies of a class.
- Added the Past Events option, that allows creating a schedule with only finished events.
- Improved the general Schedule compatibility.
- Fixed an issue with the Weekly Schedule style.
- Fixed several display issues.
- Fixed an issue with the pop-up modal window 12 hours clock display.
- Minor bug fixes.
- Weekly Class Schedule 1.3
- Added the Events Carousel schedule style, that allows classes display as carousel elements.
- Added the Daily Agenda schedule style, that allows classes display in a simple daily calendar.
- Added the Starting column in the All Classes list, that allows sorting classes by starting time.
- Improved the general Schedule Builder functionality, with more dynamic options.
- Reworked the Class options panel, for an easier customization.
- Fixed several compatibility issues.
- Fixed an issue with the pop-up modal window in Compact List style.
- Minor bug fixes.
- Weekly Class Schedule 1.2
- Added the Map Details tab for classes, that allows you to display a Google Map for your class.
- Added the Weekdays Color option in the Schedule Builder, that allows you to assign a color to a day.
- Fixed a color coding CSS bug.
- Minor bug fixes.
- Weekly Class Schedule 1.1
- Added the Backup functionality to Schedule Builder, that allows importing and exporting schedules.
- Added the Color option to Class Types panel, that allows you to use different colors for classes.
- Added the Show 12-hour Clock option in the Schedule Builder, that allows you to use a 12-hour AM / PM time for your classes.
- Added Classes XML file in the download package, that includes the demo classes.
- Added Schedule JSON file in the download package, that includes the demo schedules.
- Minor bug fixes.
- Initial Release