Free Support
We provide Free Customer Support for all Curly Themes products through our quick and easy ticket application interface. Please limit your inquiries to problems related to Weather for Visual Composer, its setup and features. For any problems concerning third-party plugins you should address the application’s developer.
Note: We can not offer support for custom CSS code customization. You should ask a professional developer for aid if you require help with advanced customization and programming.
Curly Themes offers a free ticket support application for all clients, through a real-time license code automatic verification. The dedicated app is fast and easy to use and includes an email notification feature. We will let you know as soon as your inquiry has received an answer. Thanks to our modern design, you can also upload images as an attachment to your support ticket.
Before writing a ticket please get your Purchase Code and your License Certificate:
Before opening a new ticket, please make sure you have read through all our documentation. Also, our FAQ section contains helpful answer to questions we often receive from our customers. Following these steps is in the users’ interest, as they will save valuable time. Still, we are always happy to respond to any inquiries you may have related to Weather for Visual Composer.
Installing the Plugin
weather-vc-login
Before installing this plugin, you need to have a WordPress platform already installed on your server. You can download it from WordPress.org, if you don’t have it already.
If you do not know how or you have problems with the installation, you can access helpful information at:
Also, as this is a Visual Composer add-on, you need to have the Visual Composer plugin already installed and activated on your platform, to be able to use its functionalities. If you do not have Visual Composer installed, you can see the product page here and find out more information about it. Also, you can read the Visual Composer instructions and documentations here.
Once you have a working WordPress on your server, you have two available ways to install this plugin.
FTP Upload
- Step 1 – Unzip the .zip package file you downloaded from Code Canyon and locate the folder named vc-weather
- Step 2 – Upload this folder on your server in your WordPress directory to /wp-content/plugins/
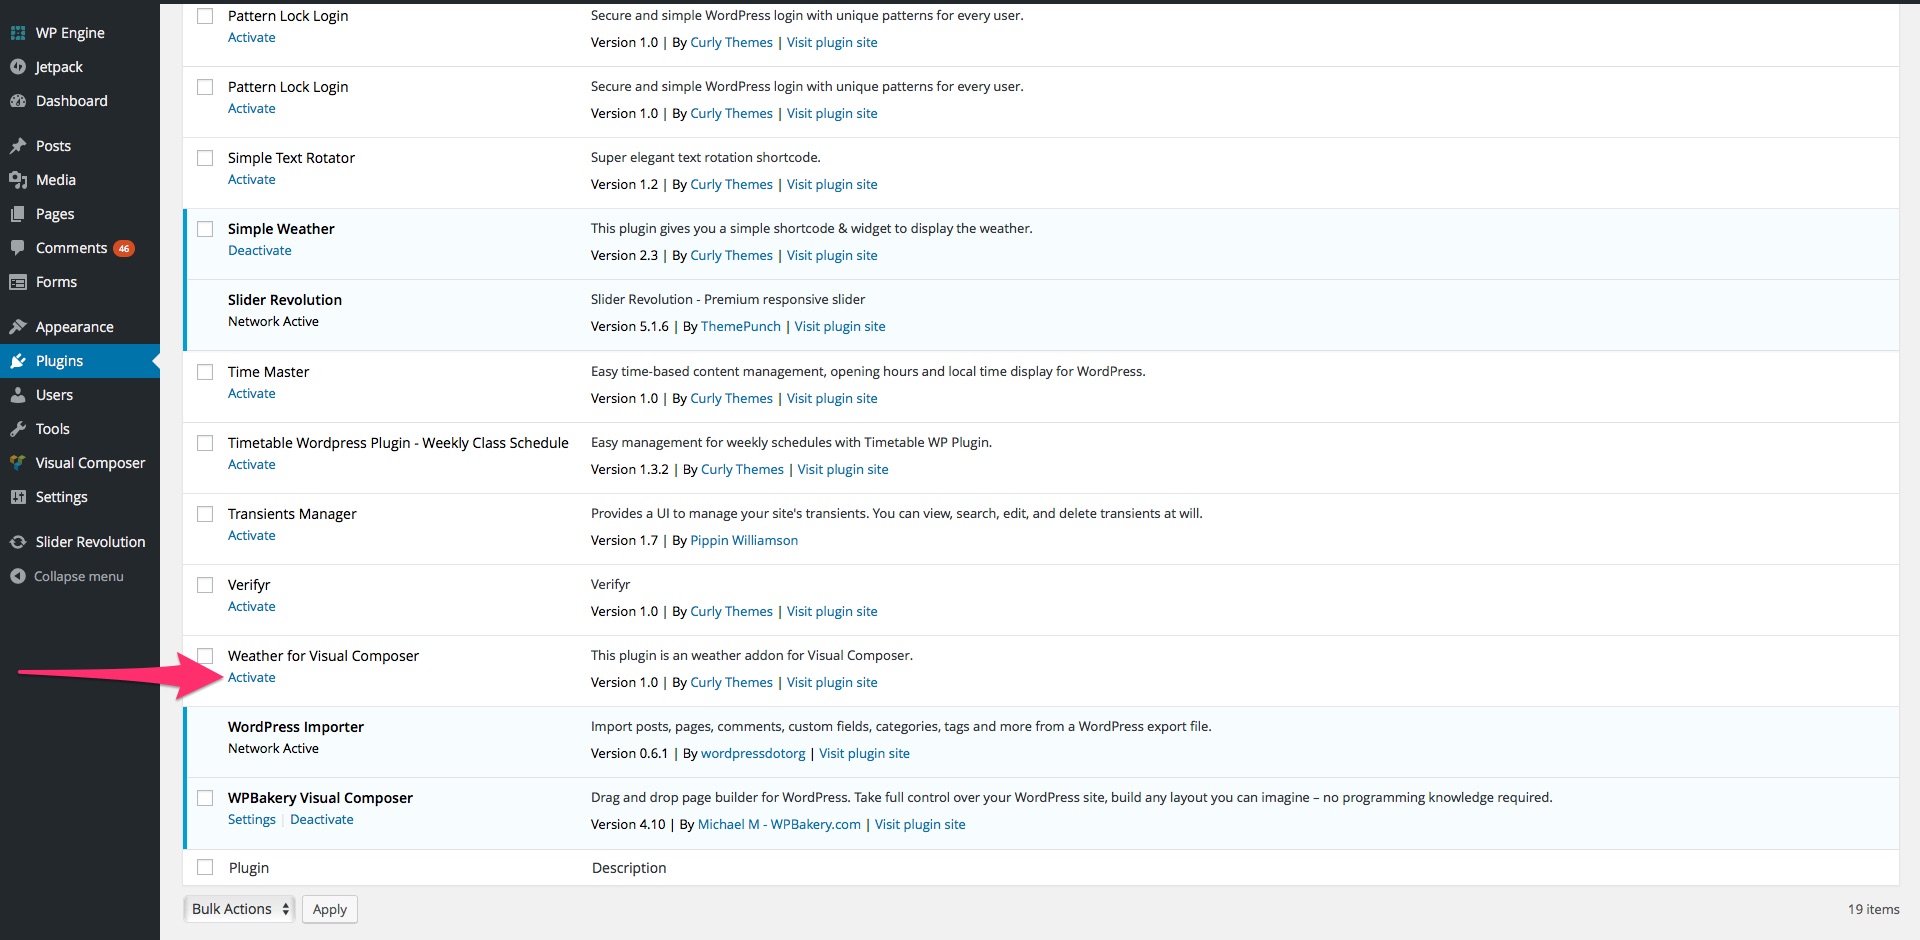
WordPress Upload

weather-vc-upload
The second way to install the plugin is by logging in from your website’s http://yourwebsite.com/wp-admin/ to the WordPress Dashboard and:
- Step 1 – Go to Appearance > Plugins > Add New > Upload
- Step 2 – From there, you should select the file vc-weather.zip from your computer
- Step 3 – After clicking the Install Now button, the installation process is finished
- Step 4 – After installing the plugin is recommended to activate it by clicking Activate Plugin
Activating Weather for Visual Composer
After you have completed the install process, in either of the two ways, you need to activate it in case you didn’t already in the WordPress installation method.
Log in to the WordPress Dashboard, go to Plugins >Installed Plugins and select Weather for Visual Composer. Click the Activate button and you can start using the plugin.
FAQ
1. I can’t find the location I want. What do I do?
You can use the Location Type option to select Latitude and Longitude and enter the coordinates. You can use this website: iTouch Map ServiceiTouch Map to get the exact coordinates.
2. How can I choose a format for the date?
If you don’t want to use our default format (day), you have to use the Date Format field, in the Settings tab, and set a value for date, according to: WordPress Date Formating
3. Why should I use my own API Key?
Using your own API Key is optional, but we recommend it, as it will improve the overall performance of our plugin, due to a better connection with the OpenWeatherMap.org website.
4. How often is the weather updated?
Our default configuration for the plugin is to update the weather for each page refresh. If you want to set a fixed interval for weather update, you can set one with the Check Interval select box, in the Settings tab (10 or 30 minutes, one or two hours).
Quick Plugin Setup
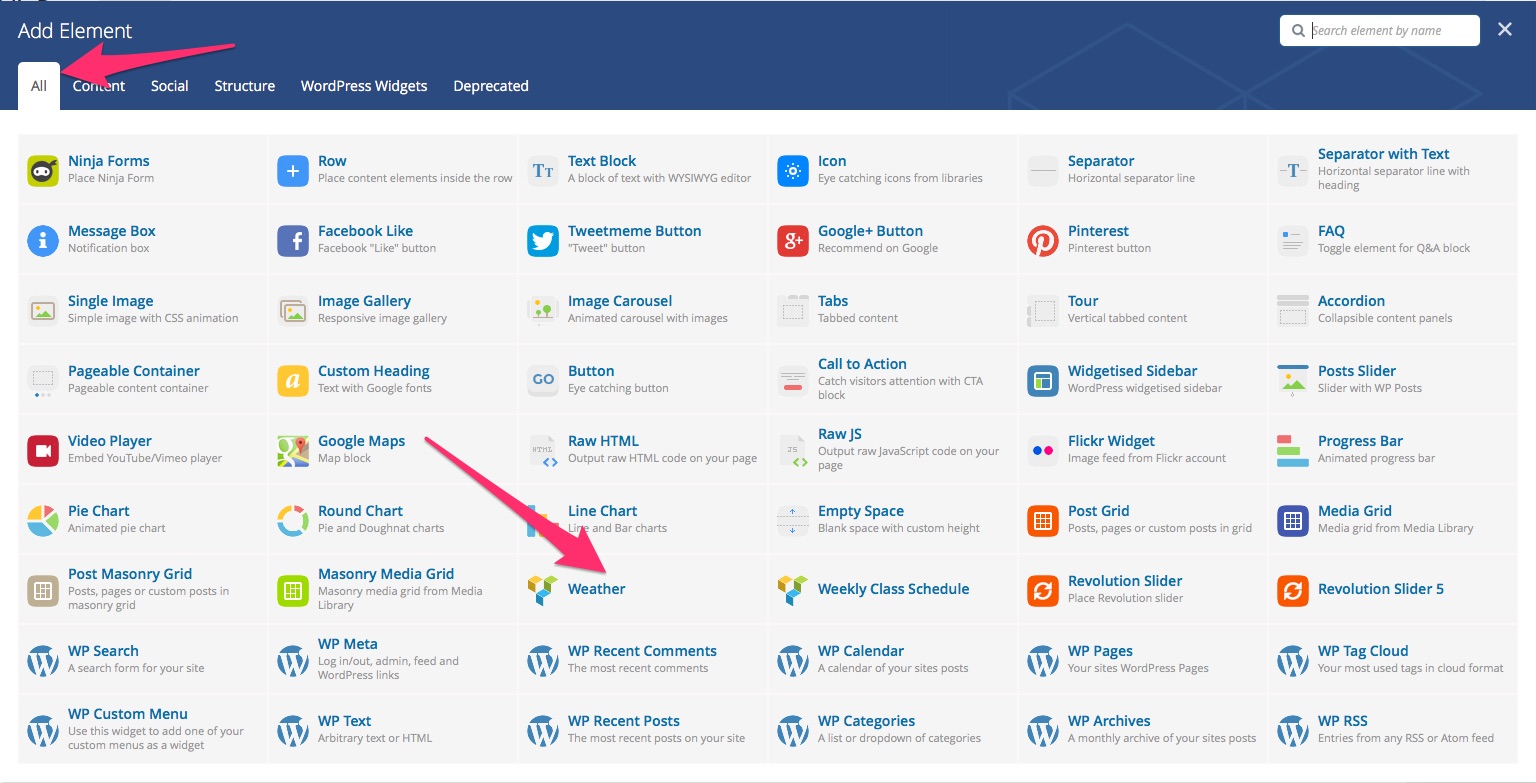
After installing and activating the plugin, you can edit a page and add the element right away. Click on the Visual Composer + button to open the Add Element menu and look for the Weather element. After clicking on our custom VC element, the Weather Settings pop-up window will appear and you will be able to customize the weather display how you want, with the following tabs.
General
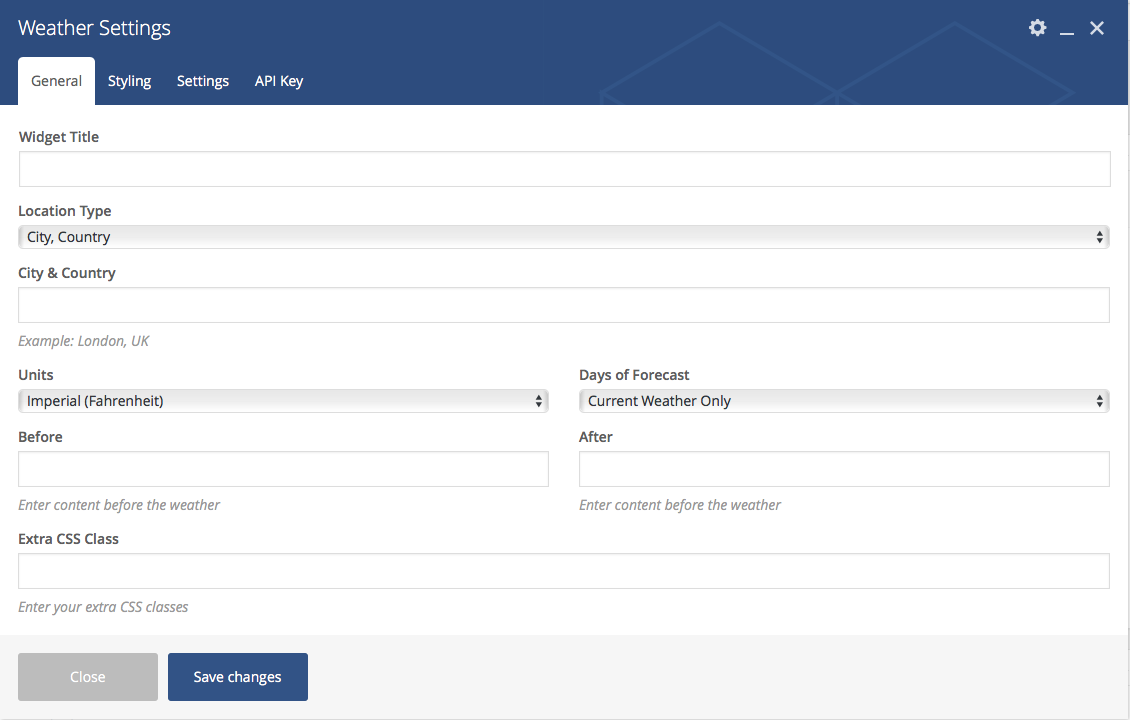
- Widget Title – Choose widget title. If no title is entered, it will display the location as title.
- Location Type – Choose how you will set the location: City and Country or Latitude and Longitude.
- City & Country – If you chose this option in the Location Type select box, you need to add the city and country here, with the following format: London, UK
- Latitude / Longitude – If you chose this option in the Location Type select box, you need to add the latitude and longitude coordinates in these fields.
- Units – Use this select box to choose between Imperial ( Fahrenheit degrees) or Metric ( Celsius degrees) units to display the temperature.
- Days of Forecast – Use this select box to choose the number of days for the forecast, between 1 and 7. If you choose Current Weather Only, it will not display a forecast for the next days, just the current weather.
- Before / After – Use these fields to add the text to be displayed before or after the weather display.
- Extra CSS Class – If you want to add your custom CSS code, you can use this field.
Styling
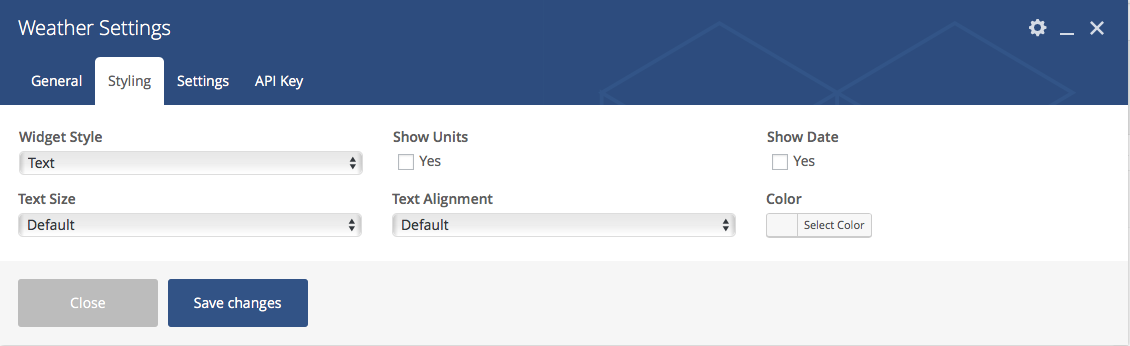
- Widget Style – Use this select box to choose how you want to display the weather, from 3 available styles: a simple Text display, List or Box.
- Text Size – Use this select box to choose the size of the text in the widget. You can use Default, to inherit the settings from your website, or set is as Small, Large or Extra Large.
- Show Units – Check this box if you want to display the Celsius / Fahrenheit symbol.
- Show Date – Check this box if you want to display the date.
- Color – Use this option to choose a color for the text.
- Text Alignment – If you choose the Text widget style, you can use this select box to align the text. You can use Default, to inherit the settings from your website, or set it at Left, Center or Right.
- Hide Days – If you choose the Box widget style, you can check this box to hide the days display.
Settings
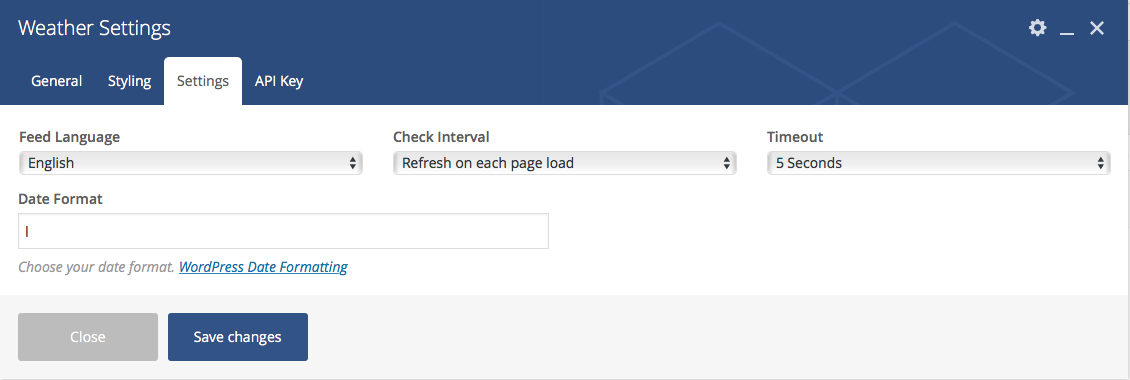
- Feed Language – Use this select box to choose the feed language*.
- Check Interval – Use this select box to choose how often the widget will update the weather info: every 10 minutes, every 30 minutes, every hour, every 2 hours or with each page refresh.
- Timeout – Use this select box to choose how many seconds should the widget try to get the weather info. You can choose between 5, 10, 30 and 40 seconds before the widget will timeout the request.
- Date Format – If you want to change the format for the date display, you can add a custom one here, according to the WordPress Date Formatting.
*Available languages: English, Spanish, Italian, French, German, Russian, Ukrainian, Portuguese, Romanian, Dutch, Polish, Finnish, Turkish, Bulgarian, Swedish, Chinese Traditional, Chinese Simplified.
API Key
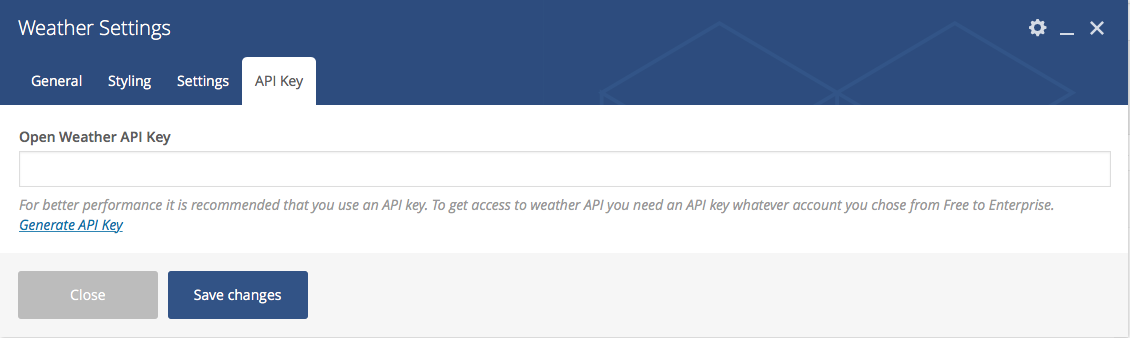
Open Weather API Key – You can use your own API Key from OpenWeatherMap.org. This will improve the general performance of our plugin. You can follow this link to create your own API Key.
Credits
Weather for Visual Composer Plugin was developed by Curly Themes. Here is a list of credits and attributions:
- Weather Feed from OpenWeatherMap.org
- Meteocons Weather Icons by Alessio Atzeni
Release Notes
- Initial Release